- Easy
- Difficulty
- 16 min
- Read time
- 10
- Steps
- 1.0
- Checked on

30-Second Quick-Start (TL;DR)
- Unlock Fever (haste ability) from the boggy region south of Leslier Glen Village to sprint faster across the map; put only 1 skill point in it.
- Unlock Shapeshift from the vampire skill tree after the prologue by drinking blood to increase corruption; transform into a wolf to leap and sprint past enemies.
- Skip carry weight perks entirely—your starting 200 carry weight is plenty, and shrines act as unlimited storage and fast travel points.
- Prioritize swordsmanship perks over vampire or witchcraft abilities because they work day and night: grab Omni Block, Perfect Repost, Perfect Block, Counter Attack, and Swiftness.
- Craft and use alchemy potions constantly—they provide permanent buffs (like +5% weapon damage) until you use a time segment, and don’t waste perk points on resource-gathering perks.
- Feed on animals or soldiers instead of innocent NPCs to keep corruption low and avoid losing control in cutscenes that permanently kill story characters.
- Loot every chest and rarity-rare gear for passive buffs (health, perfect block window) rather than raw armor rating.
- Don’t rush ability unlocks—each costs 1 hour of your 30-day time limit, so plan your build before spending points.
What This Guide Helps You Do
Build a powerful character in your first playthrough of The Blood of Dawnwalker without wasting your 30-day time limit on weak perks or story-breaking decisions. You’ll learn which abilities to prioritize, which gear to seek, and which early mistakes will lock you out of the best story outcomes.

Requirements & Prep
You should be past the prologue to access the full vampire skill tree, though you can grab the Fever ability immediately. The game runs on a day/night cycle and story quests consume time segments—this is critical to your 30-day deadline. You won’t need special items or NPCs to start, but be prepared to explore the open world and read skill books you find in chests to unlock perks.
Route Overview
Your early game should follow this priority: first, grab the two movement abilities (Fever and Shapeshift) to explore faster without wasting perk points on carry weight. Second, collect swordsmanship skill books from the open world and unlock the core defensive and damage perks (Omni Block, Perfect Repost, Perfect Block, Counter Attack, Swiftness) because they work in both day and night. Third, start looting legendary gear and upgrading it at blacksmiths—focus on passive buffs rather than armor rating alone. Fourth, craft alchemy potions as you explore and use them liberally since they provide permanent buffs until a time segment passes. Finally, decide your corruption strategy early: either embrace vampire powers by feeding on humans (accepting story consequences), or stay human-aligned by feeding on animals and using food and potions to heal during the day.

Step-by-Step Walkthrough
Unlock Fever (Haste Ability) for Fast Travel
Travel south from Leslier Glen Village into the boggy region marked on your map. You’ll find a ruined cave painting that you can inspect. During the daytime, perform a ritual at this location to trigger a boss fight against spirits. Defeat them and unlock the nearby chest to obtain the Mercurial Fever manual. Read this book from your inventory—it’ll unlock the Fever skill in the Witchcraft skill tree. Once active, you can use haste while sprinting to slow the world around you and run significantly faster, consuming only stamina. This is purely for exploration speed and isn’t worth upgrading beyond the first skill point since the upgrades only make it marginally faster and cheaper to use.
Unlock Shapeshift (Wolf Form) Right After Prologue
As soon as you finish the prologue and gain access to the vampire skill tree, start drinking blood as a vampire to increase your corruption level. Once your corruption is high enough, you’ll unlock the Shapeshift ability, which lets you transform into a wolf. In wolf form, you can sprint much faster than normal, leap far up and down mountains, and run past enemies without engaging them. Like Fever, this ability’s only worth one skill point—the upgrades don’t justify the time investment compared to combat perks.
Ignore Carry Weight Perks Completely
Don’t spend perk points on carry weight increases. You start with 200 carry weight, which is more than enough to carry a full inventory of weapons and armor without ever worrying about encumbrance. More importantly, shrines scattered throughout the open world function as both unlimited storage points and fast travel destinations. When your inventory fills up, simply fast travel to a nearby shrine, dump your excess gear there, and fast travel to a merchant to sell junk. Twenty hours into the game, you can loot roughly a third of the map and never hit carry weight limits. Save those four perk points for combat abilities.
Prioritize Swordsmanship Perks Over Vampire or Witchcraft Abilities
The swordsmanship skill tree contains perks that work both day and night, giving them twice the value of vampire-only or witchcraft-only abilities. Prioritize these perks in order:
- Omni Block (1 point): Reduces stamina cost for auto-directional blocking. This is your foundation for survivability.
- Perfect Repost (1 point): When you perfect block an enemy’s attack by matching the direction it comes from, a red arrow appears. Attack in that direction for a guaranteed critical hit. Guaranteed crits are extremely powerful in this game.
- Perfect Block (1 point): Restores your stamina after each perfect block. This creates a loop where you block, regain stamina, and attack again—essentially giving you unlimited stamina in combat.
- Counter Attack (1 point): After a perfect block, all your attacks deal 10% more damage. This stacks with critical damage bonuses, making it the bread-and-butter perk for consistent, high damage output even on higher difficulties.
- Swiftness (1 point): A passive ability that boosts your attack speed after each perfect block. Since you’ll be perfect blocking constantly, this gives you insane damage per second and keeps your offense rolling.
The sword abilities on the right side of the tree (special attacks with cooldowns) are fun but situational and require activation charges. They’re not worth prioritizing over the passive perks above. Everything else in the skill tree is optional for experimentation.
Collect Skill Books from Chests to Unlock Perks
As you explore the open world, you’ll find skill books in chests. These books must be read from your inventory to unlock the corresponding perk rank in the skill tree. You can’t unlock a perk without first finding and reading its book. Each perk you unlock costs 1 hour of your 30-day time limit, shown at the bottom right of the skill tree interface. Plan your perks carefully before committing points—don’t rush to unlock everything available early on.
Loot Legendary Gear and Upgrade It at Blacksmiths
As you explore, you’ll find weapons and armor in various rarities: common, uncommon, rare, and legendary. Rarer gear comes with passive buffs like +10% max health or +20% perfect block window. These buffs are often more valuable than raw armor rating increases. Collect legendary weapons and armor pieces, especially in the western starting region where you can find powerful swords in valleys. Any gear can be upgraded at a blacksmith to one level above your current character level. Upgrading legendary gear increases the power of its passive buffs, making it worth the investment.
You can also equip different armor sets for day and night gameplay from your inventory menu. Some gear buffs only apply when you’re a vampire or human, so having separate loadouts maximizes your effectiveness in both forms.
Seek Out Weapon Arts on Rare and Legendary Items
Some weapons unlock special attacks called weapon arts. These require you to charge them by blocking and attacking in combat, then activate them for unblockable special attacks. You’ll usually find weapon arts on rarer or legendary items, and they add significant depth to combat. Look for them as you loot and experiment with different weapons to find arts that match your playstyle.
Craft and Use Alchemy Potions Liberally
As you explore, pick up every herb and plant you see. You can use focus sight to highlight them automatically. If you gather consistently while playing, you’ll always have enough ingredients to craft potions without needing to spend perk points on resource-gathering perks. Crafting recipes are found in chests throughout the world—read them from your inventory to unlock them.
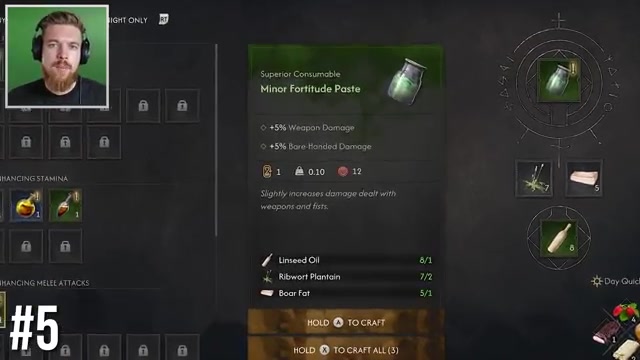
Alchemy potions provide powerful buffs: some boost weapon damage by 5% for 1 hour, others double your stamina regeneration for 3 time segments. Since the game doesn’t progress time unless you complete a quest, these buffs become permanent until a time segment is consumed. Use them constantly. A +5% weapon damage buff that lasts until your next quest is essentially a free permanent upgrade. Don’t skip alchemy—it’s one of the most powerful systems in the game.
You’ll also find free consumables in the environment (like 12% stamina regeneration for 30 seconds), but these are far weaker than crafted potions and not worth relying on.
Choose Your Corruption Strategy Early
As a vampire, you heal by drinking blood. You’ve got two paths:
Path 1: Embrace Vampirism (High Corruption) Drink human blood for stronger healing, but increase your corruption level. Higher corruption unlocks more powerful vampire abilities in the skill tree. However, if your health drops to the last segment, you’ll lose control and feed on NPCs even during cutscenes. This can permanently kill important story characters and lock you out of certain story outcomes. The power gains are real, but the story cost is high.
Path 2: Stay Human-Aligned (Low Corruption) Feed on animals or soldiers you were going to kill anyway. Heal using food and potions during the day. You’ll miss out on some vampire abilities, but you’ll maintain control in cutscenes and avoid unintended NPC deaths. This is the safer, story-friendly approach.
If you want to increase corruption quickly for vampire abilities, you can raid villages at night: defeat the guards, then feed on the innocent townspeople. You can drain them until they pass out (they’ll just fall to the ground) or drain them to death for more corruption. One village can nearly double your corruption. However, every human death comes with story consequences.
Build a Tanky Vampire (Optional Advanced Build)
If you commit to the vampire path, here’s how to become nearly unkillable:
- Endless Hunger: Increases your health segments up to five (instead of the default), giving you more total health as a vampire.
- Voracious Bite: Increases how much you heal when feeding on animals and in combat.
- Closing Wounds: Provides passive health regeneration so you don’t need to feed as constantly.
- Blood Theft: Gives all your attacks life leech, making healing in combat consistent and passive.
- Scholar Shield: Grants a 20% chance to heal 20% of your health each time you perfect block, or 10% when you block normally. This is extremely overpowered considering how often you’ll be defending yourself.
- Death from Above: Lets you instant-kill enemies from above, useful for stealthy approaches (though the game’s stealth system is limited).
Builds & Loadouts
The Perfect Block Warrior (Recommended for First Playthrough)
This is the core build the guide recommends: Omni Block → Perfect Repost → Perfect Block → Counter Attack → Swiftness. You’ll block incoming attacks, regain stamina, trigger guaranteed critical hits, and stack damage bonuses. This creates a self-sustaining loop where you’re nearly invincible while dealing consistent high damage. Pair this with any legendary sword and you’re set for the entire game. Use alchemy potions to boost weapon damage, and you’ll trivialize most encounters.
The Tanky Vampire (High Corruption Path)
If you embrace vampirism, combine the Perfect Block Warrior perks above with Endless Hunger, Voracious Bite, Closing Wounds, Blood Theft, and Scholar Shield. You’ll have five health segments, passive health regeneration, life leech on all attacks, and a 20% chance to heal 20% per perfect block. You become a walking tank that heals faster than enemies can damage you.
The Animal-Feeder Vampire (Low Corruption Path)
Use the Perfect Block Warrior perks as your foundation. Skip the heavy corruption abilities (Endless Hunger, Voracious Bite, Blood Theft) and instead rely on alchemy potions and food to heal during the day. Feed only on animals at night. This keeps your corruption low, maintains control in cutscenes, and preserves story outcomes. You sacrifice some vampire-specific power but gain narrative safety.
Troubleshooting & Common Mistakes
- Mistake: Upgrading Fever or Shapeshift beyond 1 point. Fix: These abilities are only for movement speed. The upgrades aren’t worth the time investment. Spend those points on combat perks instead.
- Mistake: Buying carry weight perks. Fix: You start with 200 carry weight and shrines provide unlimited storage. Never buy these perks.
- Mistake: Prioritizing vampire-only or witchcraft-only perks early. Fix: Swordsmanship perks work day and night, giving them double value. Build your foundation with swordsmanship first.
- Mistake: Ignoring alchemy and crafting. Fix: Alchemy potions provide permanent buffs until a time segment passes. Use them constantly—they’re one of the strongest systems in the game.
- Mistake: Choosing armor based on armor rating alone. Fix: Passive buffs (health, perfect block window, critical damage) are often more valuable than raw defense. Prioritize rarity and buffs over armor class.
- Mistake: Feeding on humans without understanding the consequences. Fix: High corruption causes you to lose control in cutscenes and kill NPCs permanently. If you want story safety, feed only on animals and soldiers.
- Mistake: Spending all your ability points immediately. Fix: Each perk costs 1 hour of your 30-day time limit. Plan your build before committing. Save before spending points so you can reload and test.
- Mistake: Skipping legendary gear and only using common items. Fix: Legendary gear’s passive buffs are game-changing. Seek them out and upgrade them at blacksmiths.
Advanced Tips & Time Saves
Use Focus Sight to Spot Herbs: The game has a focus sight mechanic that highlights plants and herbs as you explore. Use this constantly to gather alchemy ingredients without slowing down. You’ll never run out of crafting materials if you do this passively.
Fast Travel Between Shrines for Inventory Management: Instead of walking back to a merchant, fast travel to a shrine, dump excess gear, then fast travel directly to a shop. This saves significant time compared to walking or managing encumbrance.
Save Before Spending Perk Points: Test a perk by spending points, then reload if you don’t like it. There’s no penalty for experimenting, and this is the fastest way to find your ideal build.
Raid Villages at Night for Rapid Corruption (Risky): If you want to unlock vampire abilities quickly, raid a village at night, defeat the guards, and feed on townspeople. One village nearly doubles your corruption. However, this locks you into the high-corruption story path with permanent NPC deaths. Only do this if you’ve accepted those consequences.
Upgrade Legendary Gear Over Rare Gear: When you find legendary weapons or armor, prioritize upgrading these at blacksmiths. Their passive buffs scale with upgrades, making them exponentially more powerful than rare items.

FAQ
How do I unlock the Fever ability in The Blood of Dawnwalker?
Travel south from Leslier Glen Village into the boggy region, find the ruined cave painting, and perform a ritual during the daytime to trigger a boss fight. Defeat the spirits, open the chest, and read the Mercurial Fever manual to unlock Fever from the Witchcraft skill tree. The ability lets you sprint with haste, slowing the world and moving faster while consuming stamina.
Should I spend perk points on carry weight in The Blood of Dawnwalker?
No—carry weight perks are a waste of four perk points for only 100 additional carry weight when you start with 200. Shrines throughout the world act as unlimited storage and fast travel points, so you can always unload excess gear and travel to merchants. Never buy carry weight perks.
What are the best swordsmanship perks to prioritize early in The Blood of Dawnwalker?
Prioritize Omni Block, Perfect Repost, Perfect Block, Counter Attack, and Swiftness in that order. These create a self-sustaining loop where you block, regain stamina, trigger guaranteed critical hits, and stack damage bonuses. They work day and night, making them twice as valuable as vampire-only or witchcraft-only perks.
How do I avoid losing control as a vampire in The Blood of Dawnwalker?
Keep your corruption level low by feeding on animals and soldiers instead of innocent humans. If your health drops to the last segment, you’ll lose control and feed on NPCs even during cutscenes, permanently killing story characters. To stay safe, heal using food and potions during the day and feed only on animals at night.
Are alchemy potions worth crafting in The Blood of Dawnwalker?
Yes—alchemy potions are one of the strongest systems in the game. They provide permanent buffs (like +5% weapon damage) that last until a time segment is consumed, and since quests are the only things that consume time, these buffs can persist indefinitely. Gather herbs passively as you explore and craft potions constantly without spending perk points on resource gathering.
Should I focus on armor rating or passive buffs when choosing gear in The Blood of Dawnwalker?
Prioritize passive buffs over raw armor rating. Legendary and rare gear come with buffs like +10% max health or +20% perfect block window, which are often more valuable than slightly higher defense numbers. Seek out legendary items, upgrade them at blacksmiths, and equip separate armor sets for day and night gameplay to maximize buff effectiveness.
Checklist
0 of 12
Source & credit
This guide draws on the excellent video walkthrough by ESO — watch it for the full visual run-through, and give the creator your view: