30-Second Quick-Start (TL;DR)#
- Travel to the Ceres system (northwest of your starting position) to access ship-to-ship combat and weapons.
- Install a reactor and use the long-range course plot module to auto-pilot safely to Ceres.
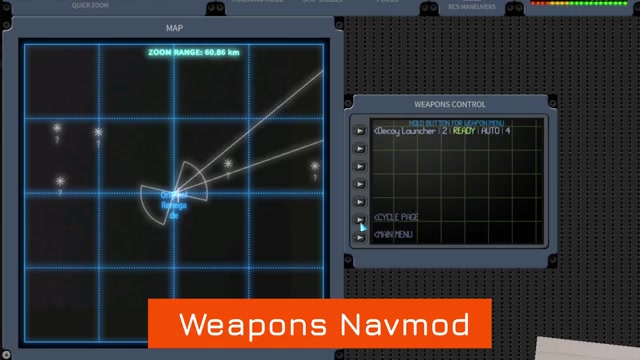
- Add the sensors navmod and weapons navmod to your NAV station to enable combat.
- Acquire better sensors (beyond the basic pre-installed ones) to track targets clearly in the Boneyard.
- Lock targets via the sensors panel (100% signal required) before firing missiles or railguns.
- Use PDCs for automatic point defense against missiles; use missiles and decoys manually.
- If combat goes badly, open COMMS, hail the enemy ship, and negotiate surrender with money or boarding permission.
What This Guide Helps You Do#
This guide teaches you how to outfit your ship with weapons, understand each weapon class, lock and engage targets, and survive your first combat encounters in Ostranauts 0.15. You’ll learn when to use PDCs, railguns, missiles, and decoys, how to configure firing groups, and what to do when a fight turns against you. This is essential for any player moving beyond the safe starting region into the Ceres system, where regional conflict means hostile ships are common.
It’s best for players new to Ostranauts 0.15’s ship combat system or those returning after a long break who need a refresher on weapons and combat mechanics.
Requirements & Prep#
Before heading to Ceres and engaging in combat, you’ll need to prepare your ship. Start by installing a reactor if you haven’t already—this is non-negotiable for any journey. You’ll also want to equip the long-range course plot module so you can auto-pilot to Ceres without manual steering.
Once you’re ready for combat, you must install two key navmods: the sensors navmod and the weapons navmod. These aren’t standard equipment and must be salvaged from wrecks or purchased from one of the major Ceres factions. Factions won’t sell to strangers, so you’ll need to build reputation with them first—a process that takes time but is worth the investment.
All ships come with basic sensors pre-installed, but they’re insufficient for combat in the Boneyard. You’ll want to upgrade to better sensor hardware (lidar and radar are mentioned as active sensors) to reduce target acquisition time and improve visibility in the asteroid field.
Optional but Helpful: Before leaving the starting region, practice navigating the NAV station layout and familiarize yourself with the menu structure. The NAV station is now modular, meaning you can customize its layout to suit your playstyle.
Route Overview#
Your journey to combat begins in the starting region, which remains completely safe—no combat will find you there. From your current position, Ceres is located to the northwest in the asteroid belt. Plot a long-range course using the course plot module and engage auto-pilot to make the journey without manual piloting.
Once you arrive at Ceres, you’ll find a large celestial body experiencing active regional conflict. This is where weapons become necessary. The area is darker and more visually complex than the starting region, making good sensors critical for tracking other ships. Ships in Ceres are hostile, and combat encounters are expected.
Your first goal upon arrival is to make contact with one of the major Ceres factions and build enough reputation to purchase weapons and navmods. Once you’ve got sensors and weapons installed, you can begin engaging targets or, if necessary, fleeing or negotiating your way out of conflicts.
Step-by-Step Walkthrough#
Prepare Your Ship for Travel#
Before leaving the starting region, ensure your ship has a reactor installed. This is your power source and is mandatory for any extended journey. Open your ship systems and confirm the reactor is functional. Then, install the long-range course plot module into your NAV station. This will allow you to set a destination and let the ship auto-pilot there without requiring manual steering.
Travel to the Ceres System#
Once your reactor and course plot module are installed, access your NAV station and plot a course to Ceres. The system is northwest of your starting position. Engage the auto-pilot and let your ship make the journey. You can monitor progress from the NAV screen. It’s a safe journey—no combat will occur en route, and you can take your time.
Install Navmods for Combat Readiness#
Upon arrival at Ceres, your first priority is to install the sensors navmod and weapons navmod into your NAV station. These modules aren’t standard and must be obtained by salvaging them from wrecks in the area or purchasing them from Ceres factions. To buy from factions, you’ll need to build reputation by trading, mining, or completing tasks for them. This is a prerequisite—factions won’t sell to unknown parties.
Upgrade Your Sensor Suite#
All ships arrive with basic sensors pre-installed, but they’re weak. The Boneyard (the asteroid field around Ceres) is visually dark, and tracking ships is difficult without upgraded sensors. Invest in better sensor hardware, specifically active sensors like lidar and radar. These will significantly reduce the time needed to lock onto targets and improve your ability to see enemy ships at greater distances. Better sensors also reduce the target’s effective signature, making lock-on faster.
Access the Sensors Panel and Learn Locking#
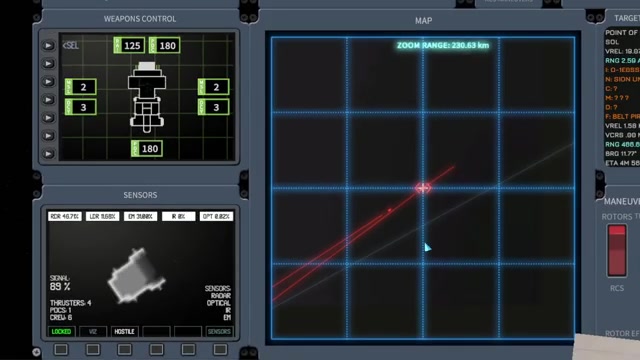
With the sensors navmod installed, open the sensors panel from your NAV station. Here you can toggle your own sensors on and off, mark other ships, and most importantly, lock onto targets. To lock a target, first select it on the nav screen. Then, on the sensors panel, select “Lock” from the main menu. The lock will take time to achieve—this depends on the target ship’s signature (affected by its size, distance, orientation, and your sensor quality). Once the signal reaches 100%, you’re locked on and can fire homing weapons.
Install Weapons and Configure Firing Groups#
Weapons come in four classes: PDCs, railguns, missiles, and decoys. Install the weapons navmod to see your ship’s weapon positions, ammo counts, which side of the ship each weapon is on, and which are ready to fire. You can assign weapons to different firing groups—collections of weapons that fire together when you press a single button or hotkey. This is critical for coordinated attacks. The firing groups navmod comes in two sizes; choose based on your ship’s available space.
Understand Each Weapon Type#
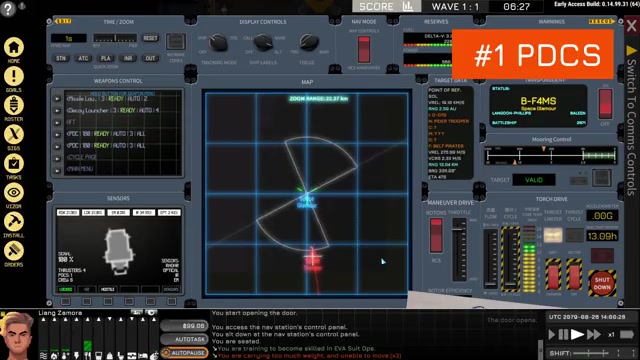
PDCs (Point Defense Cannons): These are basic defensive weapons with short cones of fire. They shoot many small bullets quickly and deal small amounts of single-target damage. PDCs are your best tool for automatic point defense—when paired with active sensors (lidar/radar), they’ll automatically fire on incoming missiles and micrometeors without requiring a lock. You can also manually fire PDCs outside their firing cones if you line up your ship’s aim and press the firing hotkey, though this requires precision and prediction.
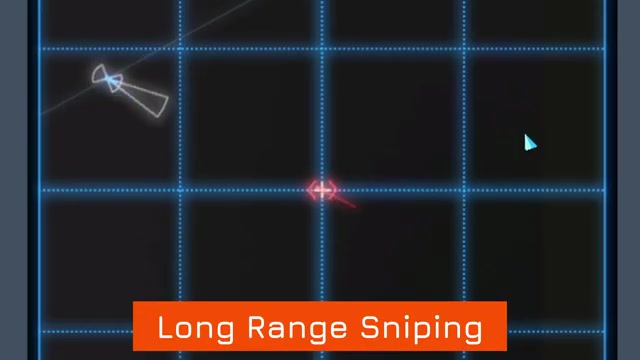
Railguns: These are long-range, single-shot ballistic weapons. They can punch through basic walls and damage components deep inside enemy ships, making them excellent for targeted strikes. Railguns can be manually fired to hit targets outside their firing cones, but they won’t auto-lock. You must manually aim by positioning your ship and predicting enemy movement.
Missiles: Long-range weapons that maneuver to hit moving targets. They deal large amounts of circular explosion damage but are expensive to fire. Missiles aren’t automatic weapons—you must manually trigger them using a hotkey or the firing groups module. Missiles will home in on locked targets, making them most effective after you’ve achieved a 100% lock.
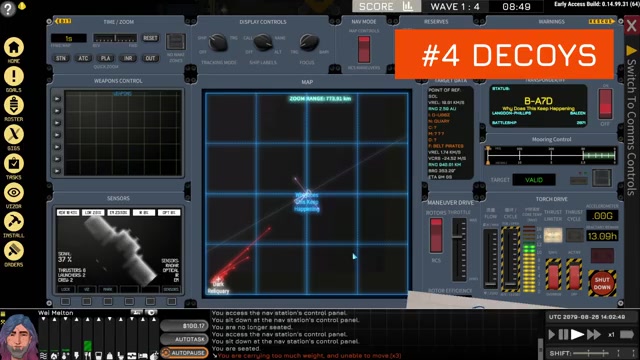
Decoys: Longer-range defensive weapons that fly like missiles but don’t explode. Instead, they’ve a chance to attract incoming enemy missiles toward themselves rather than toward your ship. Use decoys to protect yourself when you’re being targeted by enemy missiles.
Lock and Engage a Target#
Once you’ve spotted an enemy ship on your nav screen, select it. Open the sensors panel and choose “Lock.” Watch as the lock signal climbs toward 100%. The time this takes depends on your sensor quality and the target’s signature. Once locked, any missiles you fire will automatically home in. PDCs will also auto-fire on locked targets within their cone of fire. If you want to fire railguns or manually trigger missiles, you can do so at any time—they don’t require a lock, but they’re less accurate without one.
Use Active Sensors for Automatic Defense#
If enemy missiles are incoming, activate your lidar or radar (active sensors). Your PDCs will automatically engage and shoot down incoming missiles and micrometeors without needing a lock or manual input. This is passive defense and happens automatically—you don’t need to do anything except ensure your PDCs have ammo and your active sensors are powered.
Manually Fire Weapons Outside Firing Cones#
If an enemy ship is outside your weapon’s natural firing cone, you can still hit it manually. Line up your ship’s nose toward the target, predict where they’ll move, and press the firing hotkey for that weapon. This works for both railguns and PDCs but requires more skill and positioning. You won’t automatically lock when firing this way, so accuracy depends entirely on your aim and prediction.
Surrender if Combat Goes Wrong#
If a fight is going badly and you’re taking heavy damage, don’t assume you’re doomed. Open the COMMS screen and hail the enemy ship. Initiate a dialogue with them. They may demand money, allow them to board your ship, or other concessions. Surrender isn’t a free escape—it costs something—but surviving with your life intact means you can mine and salvage another day. This is often a better outcome than being destroyed.
Builds & Loadouts#
Balanced Combat Loadout#
A well-rounded ship for Ceres combat should include: PDCs for point defense (with active sensors like lidar or radar to enable auto-fire against missiles), at least one railgun for long-range precision strikes, and a small complement of missiles for high-damage burst attacks. Decoys are optional but useful if you expect to be heavily targeted. Assign PDCs and missiles to separate firing groups so you can switch between defensive and offensive fire quickly.
Defensive Loadout (If You’re Under-Geared)#
If you’re early in your Ceres reputation grind and don’t have access to expensive missiles yet, focus on PDCs with upgraded active sensors. This gives you automatic point defense against incoming fire and allows you to engage enemies at range without ammo cost. Add one railgun for precision strikes. This setup is less flashy but more sustainable for players with limited resources.
Offensive Loadout (If You’re Well-Equipped)#
Once you’ve got faction reputation and better equipment, equip multiple railguns on different sides of your ship and a full complement of missiles. Use firing groups to coordinate railgun salvos for component damage and missiles for burst damage. This requires more active piloting but deals significantly more damage.
Troubleshooting & Common Mistakes#
- Lock won’t achieve 100%: Your sensors are too weak or the target is far away. Upgrade to better sensor hardware (lidar, radar) and close the distance. The target’s signature is affected by size, distance, and orientation—position yourself for a better angle.
- Missiles not firing: Missiles aren’t automatic weapons. You must manually trigger them with a hotkey or firing group button. Check that you’ve got ammo and that the weapon is assigned to a firing group or hotkey.
- PDCs not shooting down incoming missiles: PDCs only auto-fire when active sensors (lidar/radar) are enabled. Turn on your active sensors. Also ensure your PDCs have ammo and are powered.
- Can’t see enemy ships in the Boneyard: The Boneyard is dark and visibility is poor without good sensors. Upgrade to better sensor hardware immediately. Basic sensors are insufficient for combat tracking.
- Weapons navmod won’t install: You may not have enough space on your NAV station. The weapons navmod comes in two sizes—try the smaller version. Alternatively, you may need to remove another module first.
- Factions won’t sell weapons: You haven’t built enough reputation with them yet. Complete trades, mining contracts, or salvage work for them to increase standing. Factions will refuse to sell to unknown parties.
- Railgun shots miss consistently: You’re not leading your target correctly. Railguns are ballistic and require prediction. Aim ahead of where the enemy ship is moving, not at its current position.
- Taking heavy damage and panicking: Open COMMS immediately and hail the enemy. Negotiating surrender is better than being destroyed. You’ll survive to fight another day.
Advanced Tips & Time Saves#
Optimize Your Firing Groups: Create separate firing groups for different weapon types. One group for PDCs, one for missiles, one for railguns. This lets you switch between defensive and offensive fire instantly without hunting through menus during combat.
Position for Multiple Weapon Arcs: When designing your ship’s weapon layout, place weapons on multiple sides (front, left, right, rear) so you can engage targets from different angles without turning your whole ship. This is especially useful for railguns and PDCs that have limited firing cones.
Active Sensors as Passive Defense: Once you’ve got active sensors (lidar/radar) and PDCs, you’ve got free point defense. Leave them on during travel through Ceres. Incoming missiles will be automatically shot down at no cost to you. This is a massive advantage.
Reputation Farming for Weapons: If you’re stuck without good weapons, focus on mining or salvage work for Ceres factions. This builds reputation faster than combat and gives you resources to buy better gear. Combat is optional—you can progress through the region via mining and salvage alone.
Risky Strat — Manual Railgun Dueling: Experienced pilots can engage enemies with only railguns and manual aim, avoiding the lock-on delay. This is faster but requires excellent prediction and positioning. Only attempt this once you’re comfortable with ship controls and enemy movement patterns. One mistake leaves you defenseless.
FAQ#
How do I get weapons in Ostranauts?#
Weapons are obtained by salvaging them from wrecks in the Ceres system or by purchasing them from one of the major Ceres factions. Factions won’t sell to unknown parties, so you must build reputation with them first by trading, mining, or completing salvage contracts. Once you’ve got enough standing, they’ll sell you weapons, navmods, and sensors.
What’s the difference between PDCs, railguns, missiles, and decoys?#
PDCs are short-range automatic point defense weapons that shoot many small bullets quickly. Railguns are long-range single-shot weapons that can penetrate walls and damage internal components. Missiles are expensive, long-range weapons that maneuver to hit moving targets and deal large explosion damage. Decoys are defensive weapons that attract incoming missiles away from your ship instead of exploding.
Do I need to lock a target before firing weapons?#
Missiles require a lock to home in on targets effectively, but railguns and PDCs can be fired manually without a lock if you line up your aim and predict the target’s movement. PDCs with active sensors will auto-fire on locked targets without manual input. Decoys and missiles must be manually triggered—they don’t auto-fire even when locked.
How long does it take to lock a target?#
Lock time depends on your sensor quality, the target ship’s size, distance, and orientation. Better sensors (lidar, radar) significantly reduce lock time. A nearby, small target with poor orientation toward you’ll lock faster than a distant, large target facing directly at you. You can see the lock percentage on the sensors panel—100% means you’re fully locked.
Can PDCs automatically shoot down incoming missiles?#
Yes, but only if you’ve got active sensors (lidar or radar) enabled. PDCs paired with active sensors will automatically fire on incoming missiles and micrometeors without requiring a lock or manual input. This is your primary point defense system and works passively as long as your PDCs have ammo and power.
What should I do if I’m losing a fight?#
Open the COMMS screen, hail the enemy ship, and negotiate a surrender. You may need to give them money or allow them to board, but surviving means you can mine and salvage another day. Surrender isn’t free, but it’s often better than being destroyed.
Checklist#
- Install a reactor in your ship if not already present.
- Install the long-range course plot module into your NAV station.
- Plot a course to Ceres (northwest of your starting position) and engage auto-pilot.
- Upon arrival at Ceres, obtain and install the sensors navmod into your NAV station.
- Obtain and install the weapons navmod into your NAV station.
- Upgrade your ship’s sensor hardware to better sensors (lidar and radar) beyond the basic pre-installed sensors.
- Acquire weapons by salvaging from wrecks or building faction reputation for purchases.
- Install at least one PDC with active sensors for point defense.
- Install at least one railgun for long-range precision strikes.
- Install missiles for high-damage burst attacks (optional but recommended).
- Configure firing groups in the weapons navmod to organize weapon types for quick switching.
- Practice locking targets on the sensors panel until you achieve 100% signal.
- Test automatic PDC fire against incoming missiles with active sensors enabled.
- Engage your first combat encounter or use COMMS to negotiate if overwhelmed.
Source & credit#
This guide draws on the excellent video walkthrough by Kitfox Games — watch it for the full visual run-through, and give the creator your view:
https://www.youtube.com/watch?v=gEmq2SQ1ezIFollowing Ostranauts? Get an email when we publish a new guide — or update one after a patch.