
30-Second Quick-Start (TL;DR)#
- Run Wind Surge and Healing Art as your core skills; Healing Art is the only true hard support ability and cleanses anti-heal.
- Use Punishment Rune (solos) or Death Ward (trios) as your third skill to enable turret totem procs and shield your team.
- Layer Intimidation Rune (free knockback) and Burst Rune (stagger setup) for crowd control and pressure.
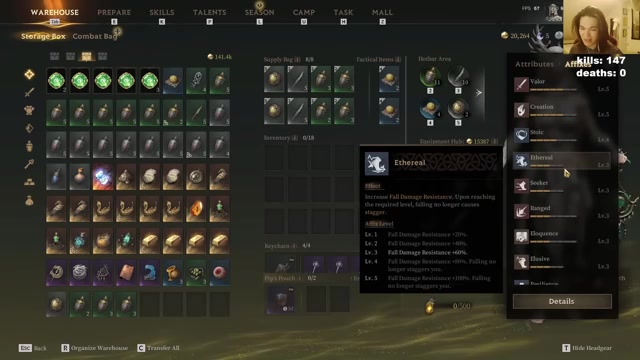
- Mandatory affixes: Valor 5, Eloquence 5, Elusive 5, Stoic 5; add Ethereal 5 for solos (jump-kiting protection).
- Playstyle is patience-based: fortress up, wait for openings after their evades, chain stuns from Burst Rune into heavy attacks.
- In trios, prioritize Wind Walker Totem (doubles ally dodge distance) and assist with damage, not pure healing.
- Key positioning: use terrain and doors to separate fights and avoid multi-team pressure.
What This Guide Helps You Do#
Master the Reverent Seer support class in Mistfall Hunter’s 1v1 solos and 3v3 trios, achieving high kill counts (147+ in a single run) while staying alive through smart resource management, stagger chains, and positioning. This guide is for players who want to understand how to play range support Seer effectively—not as a passive healer, but as an aggressive, patient kiter who controls fights through crowd control and burst damage windows.
Best for: Seer players transitioning from other classes, players who want to learn the full depth of support Seer beyond just healing, and anyone looking to compete in both solo and team formats.
Requirements & Prep#
You’ll need access to the Seer class and enough currency to purchase or craft the affixes and talents listed below. Mistfall Hunter affixes scale with rarity; blues and greens are available on the auction house, so you can build a functional loadout at any gear tier.
Core consumable: Wine (level 4 recommended) to boost movement speed for kiting. It’s not mandatory, but it’ll really help with survivability.
Loadout station access: You’ll need to visit a loadout station to swap skills, talents, and affixes between solos and trios. The creator recommends checking the official Mistfall Hunter Discord for pre-built loadout codes if you want to copy exact setups, though this guide covers all the principles you need to build your own.
Optional but Helpful: If you’re building on a tight budget, prioritize Valor 5, Stoic 5, Eloquence 5, and Elusive 3 (upgrade to 5 later). This blue-tier foundation will carry you until you can afford purples.
Route Overview#
The Reverent Seer support build operates on a simple loop in solos: land at a gate, scan the map for early skirmishes and loot hotspots (chests and double spawns), engage enemies with Burst Rune setup, chain stuns into heavy attacks, kite using terrain and Ethereal 5 fall immunity, and rotate toward the boss. The playstyle isn’t about chasing kills aggressively; instead, you fortress up at terrain chokepoints, wait for enemies to commit to you, punish their evades with Wind Surge stuns, and use Healing Art to stay in the fight. In trios, the strategy shifts: you’re still dealing damage and using your runes, but you prioritize Wind Walker Totem placement to double your team’s dodge speed and use Death Ward to shield allies when it expires.
Solo fights are won by patience and stagger chaining. Trio fights are won by map control and totem placement.

Step-by-Step Walkthrough#
Skills: Why Wind Surge and Healing Art#
Wind Surge is your primary engagement and escape tool. When you fully charge a heavy attack after landing Wind Surge’s knockback, the Opportunist Strike talent stuns your opponent. This is guaranteed damage and pressure every time, so you’ll use it constantly. The stun window gives you free heavy attacks or distance.
Healing Art is the only hard support skill in the game. Don’t pick Barrier—it’s significantly worse. Healing Art heals for more when used on low-health teammates, and critically, it cleanses all debuffs before healing. This includes paralysis arrows, barbed arrows, blood fly arrows, sorcerer burns, and anti-heal. Anti-heal cleanse is the key reason to pick this skill: you remove the anti-heal debuff, then immediately heal, bypassing the enemy’s pressure tool entirely. You get four charges in solos and six in trios.
Third Skill: Punishment Rune (Solos) or Death Ward (Trios)#
In solos, run Punishment Rune. Its main value is that your turret totem will proc your Seeker (a powerful passive that likely grants damage or mobility). Proccing Seeker frequently is essential for kiting and maintaining pressure.
In trios, swap to Death Ward. Take the talent that grants a shield to an ally whenever Death Ward expires. This gives your team passive protection and lets you contribute to team defense without healing spam.
Rune Toolkit: Intimidation, Burst, and Turret Totem#
Intimidation Rune is a free, instant knockback that costs zero resource pips. You can cast it even with an empty resource bar. It’s your panic button and your setup tool. If an enemy breaks the rune, it triggers a second knockback. This makes it extremely annoying for melee characters to approach you, especially if you’re standing near the rune and forcing them to decide between breaking it and taking a knockback or walking around it and losing time.
Burst Rune is your main pressure and stagger tool. It’s a wide, far-reaching AoE that staggers on impact and applies a debuff. When the debuff expires, it detonates and deals damage again, plus another stagger. This dual-stagger window is your guaranteed heavy attack setup. Here’s the chain: land Burst Rune, wait for the debuff to tick (don’t let them dodge it by timing their evade into you), then when the debuff pops, they’re staggered and you land a free heavy attack. This is reliable if you know the timing—and the timing comes only from practice.
Turret Totem is your area control and Seeker proc tool in solos. Place it to block enemy paths or to proc Seeker when you need kiting mobility. In trios, you’ll use Wind Walker Totem instead, which is significantly stronger: it reduces enemy dodge distance while increasing your allies’ dodge distance. The effect is so powerful that if the enemy team doesn’t kill your Wind Walker Totem, you’ll likely win the fight.
Wind Surge Setup and Stun Chain#
Wind Surge’s knockback is your primary engagement tool. However, if your opponent has an evade active (I-frame), they’ll dodge through your Wind Surge and you lose the setup. So, only cast Wind Surge when you know it will land. The safest time is after they’ve already used their evade to close distance on you. Here’s the pattern: they dodge toward you, you dodge away, they follow with another closer (another dodge or a dash), you wait for that closer to land, then you immediately cast Wind Surge to knock them back. Now they’re separated from you and their evade is on cooldown. Charge your heavy attack fully. They will try to dodge your heavy. Wait for them to dodge. Once they dodge, your heavy lands and the Opportunist Strike talent stuns them. Now you’ve got free damage or distance.
The name of the game is patience. You can’t chase kills effectively as range Seer, and you can’t run away forever either. Instead, you fortress up at terrain, wait for them to come to you, and punish their commitment.
Healing Art in Practice#
Healing Art heals for nearly 400 HP instantly in the build shown (numbers may’ve been slightly nerfed from playtests). Think of it as another horn—a reliable, on-demand heal. Its debuff cleanse is the real value: if an enemy lands anti-heal on you, use Healing Art immediately. It cleanses the anti-heal first, then heals you, so the enemy’s pressure tool is completely negated. You don’t need to be a pure healer; you heal when you need it and deal damage the rest of the time.
Engaging Around Corners and Terrain#
When an enemy is around a corner or at range, prep your Burst Rune behind cover so they don’t see it coming. Move out slightly to bait them, then retreat. If they commit to chasing you, they’ll walk into the Burst Rune. The debuff will tick, and when it pops, they’re staggered. Chain into a heavy attack. If they don’t chase, you’ve still applied pressure and can reposition.
Terrain is your ally. Use pillars, walls, and elevation changes to break line of sight and force enemies to reposition. If you’re being chased by multiple enemies and there’s a high drop, jump down. With Ethereal 5 (see Affixes section), you take no fall damage and don’t get staggered. If they follow, they take damage or die. If they don’t, you’ve created distance.
Resource Management and Rune Timing#
Intimidation Rune costs zero pips, so it’s always available. Burst Rune and Wind Surge cost resource pips. You regenerate resource naturally over time and by landing attacks. The key isn’t to waste your pips on missed Burst Runes or Wind Surges that your opponent will I-frame. Only cast Wind Surge when they’ve just used their evade. Only cast Burst Rune when you’re confident they’ll walk into it or when you need the pressure immediately. If you’re low on pips and they’re approaching, use Intimidation Rune to buy time while your pips regenerate.
Builds & Loadouts#
Solo Seer Loadout (Affixes and Talents)#
Mandatory affixes (all tiers):
- Valor 5 — Increases damage output across the board.
- Eloquence 5 — Grants super armor for one hit every 10 seconds while channeling or casting. Essential for surviving burst.
- Elusive 5 — Mandatory because Shadow Strike exists and you’ll be dived. You need to evade spam to survive.
- Stoic 5 — Provides a cheat-death mechanic at max tier. Non-negotiable for solos.
- Ethereal 5 — This is the solo-specific powerhouse. Falling no longer staggers you, and you gain 100% fall damage resistance. This lets you jump down cliffs to escape multi-team pressure or kite in vertical terrain indefinitely. One of the best solo affixes in the game.
Optional affixes for advanced setups:
- Seeker 4 — Adds damage or mobility from your Seeker passive. Only needed if you’re high-geared; skip it if you’re in low-tier gear.
- Creation 5 — Buffs totem duration by 20% and grants 5% damage after using a totem. Only useful if you’re running a turret-heavy build for fun, not for optimization.
Blue-tier budget loadout (if you can’t afford purples yet): Valor 5, Stoic 5, Eloquence 5, Elusive 3 (upgrade to 5 later), Ethereal 3 (upgrade to 5 as soon as possible). This foundation will carry you through early gear tiers.
Trio Seer Loadout#
Swap out Punishment Rune for Death Ward and take the shield-on-expiry talent. Replace your solo totem with Wind Walker Totem. Wind Walker Totem is borderline overpowered: it reduces enemy dodge distance while doubling your allies’ dodge distance (same animation frames, so they move twice as far in the same time). If the enemy team doesn’t kill your Wind Walker Totem, you’ll likely win. Prioritize placing it in the center of fights where all three allies can benefit.
Affixes remain similar: Valor 5, Eloquence 5, Elusive 5, Stoic 5. You don’t need Ethereal in trios (no solo vertical kiting needed), so use that slot for damage or utility affixes.
Talents (Core Setup)#
Always take:
- Opportunist Strike (stun after Wind Surge knockback + full heavy charge).
- Breakaway Shield talent (grants a shield based on your attack stat whenever you use your free evade during a breakaway). This is one of the best talents in the game—you essentially get free hits because the shield absorbs damage.
- The talent that makes your heavy attacks enhanced every two hits (tracking talent). This increases your damage output significantly.
- For trios only: the talent that grants shields to allies when Death Ward expires.
Optional based on playstyle: The creator runs Synergy and Turret Totem talents for fun, even though they’re not optimal. They explicitly say “do as I say, not as I do.” If you want to optimize, skip these and use the core talents above.
Utility Slots#
Run Spell Keys in your utility slot. They instantly open and close doors, which is extremely valuable for separating fights and kiting. The creator initially ran a different setup but acknowledges Spell Keys are the correct choice. Avoid Knives; Pills are only for maxing shop upgrades if you’re missing them.

Affixes Deep Dive: Why Ethereal 5 is Solo Carry#
Ethereal 5 is the secret weapon for solos. It was nerfed from requiring level 4 to level 5 between playtests, but it’s still incredibly strong. Here’s why: if you’re being chased and there’s a high drop (an elevator shaft, a cliff, a deep pit), you jump down. You take zero fall damage and don’t get staggered. If your chaser follows, they either take damage or die. If they don’t follow, you’ve created distance. Even better, if there’s a wind sigil or jump pad at the bottom, you can jump back up while they’re falling down, and they can never catch you because you’re moving faster vertically.
This is pseudo-infinite kiting against aggressive opponents and provides protection against teaming. The creator uses this frequently: when teamed on, they jump down an elevator shaft, and one of the teamers always follows thinking they can match the jump. They can’t, and they die or have to call the elevator up slowly while the creator escapes.
Ethereal 5 isn’t optional for solos if you want to play at a high level.
Troubleshooting & Common Mistakes#
- Mistake: Casting Wind Surge into an evade. Fix: Only cast Wind Surge after you’ve confirmed their evade is on cooldown. Bait them to evade toward you, dodge away, wait for their next closer, then cast Wind Surge.
- Mistake: Using Burst Rune too early or too predictably. Fix: Cast Burst Rune around corners or when they’re chasing you, not in open space where they can see it and dodge. The debuff window is your stun setup, so timing matters.
- Mistake: Running out of resource pips with no escape. Fix: Use Intimidation Rune (free, zero pips) as your panic button while pips regenerate. It’s always available.
- Mistake: Chasing kills too aggressively. Fix: Range Seer doesn’t chase well. Fortress up at terrain and wait for enemies to come to you. Patience wins fights.
- Mistake: Skipping Ethereal 5 in solos. Fix: This affix is one of the best in the game for solo survival. Prioritize it after your core four affixes (Valor, Eloquence, Elusive, Stoic).
- Mistake: Using Healing Art reactively instead of proactively. Fix: Pre-emptively cleanse anti-heal before it stacks. Use Healing Art the moment anti-heal lands on you, not after you’ve already taken damage from it.
- Mistake: Not placing Wind Walker Totem in trios. Fix: In trios, Wind Walker Totem is your win condition. If the enemy doesn’t kill it, you win. Place it centrally and defend it.
- Mistake: Playing as pure support healer. Fix: You deal significant damage as Seer. Heal when needed, but spend most of your time dealing damage and setting up stuns. Pure support is inefficient.

Advanced Tips & Time Saves#
Stagger Chaining for Guaranteed Damage#
The Burst Rune stagger chain is the core damage pattern. Land Burst Rune, let the debuff tick (watch the timer), wait for the debuff to detonate (it’ll stagger them automatically), then immediately chain into a full heavy attack. This is guaranteed every time if you know the debuff duration. Practice the timing in training mode until it’s muscle memory.
Terrain Abuse and Door Keying#
Spell Keys are underrated. You can key a door to instantly open or close it, which lets you drag fights away from annoying PvE mobs or separate multi-team pressure. If you’re being chased by a Meatball or other tanky mob while fighting a player, key a door to move the fight to a cleaner area. This saves you time and prevents getting sandwiched.
Seeker Proc Timing#
Your Punishment Rune (solos) or turret totem procs your Seeker passive. Seeker likely grants a damage or mobility buff. Proc it frequently during extended fights to maintain pressure and kiting speed. The creator mentions using wine to show kiting speed, but Seeker procs are your consistent mobility tool.
Reading Opponent Commitment#
Watch for when your opponent commits to a closer (evade, dash, or charge). The moment they commit, that’s your window to cast Wind Surge or Burst Rune. If they’re spacing you or playing passively, don’t force it—wait for them to move first. Patience wins.
Elevator Shaft Kiting (Ethereal 5 Tech)#
If you’re in a map with vertical terrain and have Ethereal 5, jump down when being chased. Most opponents will follow and die or take heavy fall damage. Even if they’ve got Ethereal too, you can activate a jump pad or sigil at the bottom to jump back up while they’re still falling, and they can’t catch you. This is a high-risk, high-reward play that only works with Ethereal 5.
Avoiding DC Deaths#
The creator mentions DCing mid-fight while running uniques (high-end gear). This is rare but catastrophic. If you’re playing with expensive gear, be aware that disconnects happen and you might lose your run. There’s no fix for this—it’s a game issue—but it’s worth knowing the risk exists.
FAQ#
Why is Healing Art better than Barrier?#
Healing Art is the only hard support skill in the game and is significantly stronger than Barrier in every way. Healing Art heals for more based on missing HP (yours or teammates’), cleanses all debuffs including anti-heal before healing, and provides a reliable defensive tool. Barrier doesn’t cleanse debuffs and heals for less. There’s no scenario where Barrier is the correct pick over Healing Art.
How do I set up the stagger chain with Burst Rune?#
Land Burst Rune on your opponent. The rune applies a debuff that ticks down. When the debuff expires, it detonates automatically and staggers them. The moment it staggers, chain into a full heavy attack for guaranteed damage. The timing is consistent once you practice it, but it requires knowing your Burst Rune’s debuff duration. Train this in the training room until it’s automatic.
What’s the best way to use Wind Surge without getting punished?#
Only cast Wind Surge after your opponent has used their evade. Bait them to evade toward you, dodge away, wait for them to use another closer (another evade or dash), then immediately cast Wind Surge to knock them back. Now their evade is on cooldown and you can safely charge a heavy attack. Casting Wind Surge into an active evade is a wasted cast.
Is Ethereal 5 required for solos?#
Ethereal 5 isn’t technically required, but it’s one of the best solo affixes in the game and provides pseudo-infinite kiting in vertical terrain. If you’re serious about solos, prioritize it after your core four affixes (Valor 5, Eloquence 5, Elusive 5, Stoic 5). It’s the difference between surviving multi-team pressure and dying to it.
How do I play Reverent Seer in trios differently than solos?#
In trios, swap Punishment Rune for Death Ward and use Wind Walker Totem instead of Turret Totem. Wind Walker Totem is the win condition—it doubles your allies’ dodge distance while reducing enemy dodge distance. Place it centrally and defend it. You still deal damage and use your runes, but your primary focus is totem placement and team coordination. If the enemy doesn’t kill your Wind Walker Totem, you’ll likely win the fight.
What should I do if I get teamed on in solos?#
If multiple enemies are focusing you, use terrain to separate them. Jump down an elevator shaft or high drop if available (especially with Ethereal 5, which makes you immune to fall damage). If they follow, they die or take heavy damage. If they don’t, you’ve created distance. You can also key a door to move the fight to a cleaner area away from other players. The goal is to split the team up so you’re not fighting all of them at once.
Checklist#
- Equip Wind Surge and Healing Art as your two core skills.
- Add Punishment Rune (solos) or Death Ward (trios) as your third skill.
- Take Opportunist Strike talent to stun after Wind Surge knockback + full heavy charge.
- Take Breakaway Shield talent for free damage absorption on evades.
- Equip Intimidation Rune and Burst Rune for crowd control and stagger setup.
- Equip Turret Totem (solos) or Wind Walker Totem (trios) for area control and team buffs.
- Prioritize affixes: Valor 5, Eloquence 5, Elusive 5, Stoic 5 (all tiers).
- Add Ethereal 5 to solos for fall immunity and vertical kiting.
- Equip Spell Keys in utility slot for door control.
- In solos, only cast Wind Surge after confirming opponent’s evade is on cooldown.
- Practice Burst Rune stagger timing: land rune → wait for debuff → detonate → heavy attack chain.
- Use terrain and Ethereal 5 jumps to escape multi-team pressure; kite vertically if available.
- In trios, place Wind Walker Totem centrally and defend it—it’s your win condition.
- Use Healing Art to cleanse anti-heal debuffs before they damage you; don’t wait until you’re low HP.
Source & credit#
This guide draws on the excellent video walkthrough by LichKArthus — watch it for the full visual run-through, and give the creator your view:
https://www.youtube.com/watch?v=ts141m6ZM_QFollowing Mistfall Hunter? Get an email when we publish a new guide — or update one after a patch.