30-Second Quick-Start (TL;DR)#
- Enter the arena where the Artist boss appears as a massive health bar enemy.
- Dodge incoming projectile attacks at the last second; standing still then dodging is more reliable than pre-dodging.
- Build the stagger meter (shown at the bottom of your screen) by dealing consistent damage with your equipped form.
- When the stagger meter fills, trigger an execution for a large chunk of damage.
- Manage health by picking up dropped health elements from defeated enemies and looking for larger health pickups scattered in the arena.
- Avoid the long wind-up attacks; they track aggressively, so dodge only when the attack commits.
- After the fight, you’ll gain new combat abilities and talents to spend at the gap.
- Use your dodge roll liberally—there’s no parry system in Control Resonant, only dodging.
What This Guide Helps You Do#
This guide teaches you how to defeat the Artist boss in Control Resonant, a mandatory story encounter that introduces you to the game’s combat flow, stagger mechanics, and ability progression system. You’ll learn attack patterns, safe punish windows, and resource management so you can survive and win without grinding elsewhere. It’s best for first-time players encountering the Artist and anyone who’s died once or twice and wants a structured approach to the fight.
Requirements & Prep#
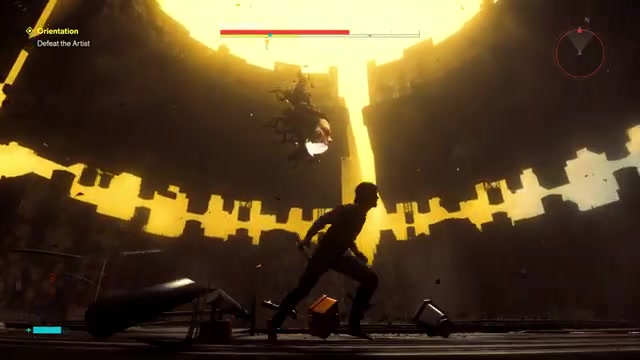
You’ll need to reach the Artist arena through story progression in the game’s early chapters. The fight takes place in “Echoes of Infinity”—an art museum-like space with a massive health bar enemy. There’s nothing special to bring or equip beforehand.
When you first enter the arena, you’ll have your equipped form (Strike, Glaive, or another option you chose earlier). The game gives you one form at the start, and you can switch between forms or unlock new ones as you progress. Your starting form is sufficient for this fight.
Your dodge roll is your primary defensive tool. Since there’s no parry system, you’ll rely entirely on rolling to avoid damage. Make sure you’re comfortable with your controller’s dodge button (L1 on PlayStation, likely LB on Xbox) before entering.
Optional but Helpful: Before the fight, spend any talent points you’ve earned on damage-boosting talents or critical hit chance. The transcript shows you choosing talents like “Dodge attacks have more critical hit chance” and “Combo finishers” upgrades. They’re not required, but they’ll make the fight shorter.
Route Overview#
The Artist boss encounter is a single-arena fight with no movement between zones. You enter, see a massive health bar, and begin combat. The boss attacks in waves and patterns: it throws projectiles at you, performs long wind-up attacks with heavy tracking, and occasionally creates floating effects you’ll need to navigate around. Your job is to dodge these attacks, close the distance when safe, build the stagger meter through consistent damage, and trigger executions when it fills. Health drops appear on the ground as you damage the boss; collect these to stay alive. The fight ends when the boss’s health reaches zero, and you’ll gain new combat abilities and a chance to spend talent points at the gap.
Step-by-Step Walkthrough#
Enter the Arena and Observe the Boss#
When you first enter, you’ll see the Artist boss with a massive health bar at the top of the screen. Don’t rush in. Take a moment to note the arena layout—there’s open space where you can move freely, and health elements are scattered around. The boss is stationary at first, giving you time to approach.
Close the Distance and Start Attacking#
Move toward the boss and begin using your equipped form’s basic attacks. Strike and Glaive both deal damage, though at different rates. As you attack, you’ll see a small stagger meter appear at the bottom of the screen. Keep attacking until the boss begins its first offensive phase.
Recognize and Dodge the First Attack Pattern#
The boss will begin attacking. Its most common attack is a projectile throw—it’ll wind up and send projectiles toward you. The key to dodging is timing: don’t dodge early. Stand still or move slightly, then dodge at the last moment when the projectile is nearly upon you. The transcript shows you struggling with early dodges and succeeding when you wait longer. If you dodge too early, the projectile will still hit you because you’ve already committed to your dodge animation.
Handle the Long Wind-Up Attack#
The boss has a particularly dangerous attack with a very long wind-up. When you see this begin, back away to create space. The attack tracks aggressively, so don’t try to dodge around it—dodge away from the direction the boss is facing instead. Once the attack is committed and moving, you’ve got a brief window to close back in and attack.
Build Stagger and Trigger Execution#
As you continue attacking between dodges, the stagger meter at the bottom of your screen will fill. When it reaches full, the boss will briefly pause or become vulnerable. This is your execution window. Press the execution button (likely L3 or another input shown on screen) to trigger an execution attack that deals a large chunk of damage and resets the stagger meter.
Collect Health Elements and Manage Resources#
As you damage the boss, small health elements will drop onto the arena floor. Move to these and pick them up to restore your health. Larger health elements also appear in fixed locations around the arena. If you’re one hit away from death, prioritize moving to a health pickup over attacking. The boss will continue to attack, so be ready to dodge while moving toward health.
Repeat the Cycle Until the Boss Falls#
Keep the pattern going: dodge attacks, close in and attack, build stagger, trigger execution, collect health. The boss’s health bar will slowly decrease. On your second or third attempt, you should have a feel for the timing and be able to anticipate attacks more easily. The fight ends when the boss’s health reaches zero.
Boss Strategy: Phase by Phase#
Opening Phase: Projectile Attacks and Positioning#
Trigger: The fight begins as soon as you enter the arena and approach the boss.
The boss starts by throwing projectiles at you. These attacks are telegraphed by a wind-up animation. Your safe punish window is immediately after you dodge—the boss will be recovering from its attack for roughly 1–2 seconds. During this window, close the distance and land 2–3 basic attacks before backing away to prepare for the next projectile. Don’t get greedy; the boss attacks frequently, and overstaying will get you hit.
Avoidance: Stand still or move laterally, then dodge at the last moment when the projectile is nearly upon you. Dodging too early wastes your invincibility frames and leaves you vulnerable. The transcript explicitly shows you succeeding when you wait longer to dodge.
Mid-Phase: Long Wind-Up and Tracking Attacks#
Trigger: After several projectile exchanges, the boss will perform a long wind-up attack with heavy tracking.
When you see the boss begin this wind-up, immediately back away to create maximum distance. The attack will track toward you, but it has a long animation. Dodge away from the boss’s facing direction (not toward it), then immediately counter-attack once the attack has passed. The tracking is “by far insane,” according to the transcript, so respect it and don’t try to dodge through the attack.
Safe Punish: After the tracking attack resolves, you’ve got a 2–3 second window to attack. Land as much damage as possible, but keep one dodge roll ready in case the boss immediately follows up with a projectile.
Late Phase: Floating Effects and Stagger Meter Focus#
Trigger: As the boss’s health decreases, it may create floating effects or alternate its attack pattern.
By this point, your stagger meter should be filling regularly. Focus on keeping pressure on the boss to keep the stagger meter rising. Dodge attacks as they come, but don’t back away excessively—staying closer allows you to build stagger faster. When the stagger meter is nearly full, position yourself to trigger the execution immediately after the next attack resolves.
Recovery Plan if Punished: If you take a hit and your health is low, immediately back away and move toward the nearest health element. The boss will attack again, so dodge and reposition rather than panic-attacking. Being one hit away from death is common in this fight; it’s recoverable if you stay calm and collect health.
Builds & Loadouts#
At the start of the game, you choose between Strike, Glaive, and other forms. Strike offers 30% critical chance as a starting bonus, while Glaive offers more raw damage but no critical chance. Both are viable for the Artist fight. The transcript shows you choosing Strike and successfully using it throughout.
After defeating the Artist, you unlock new combat abilities. The game offers options like Barrage (a multi-hit attack), Volatile (anomaly-based), and Shield (a shield bash). You also gain access to talents that modify your existing attacks—for example, “Dodge attacks have more critical hit chance” or “Combo finishers” upgrades that increase your damage output.
Recommended Loadout for Artist Fight: Use your starting form (Strike or Glaive) and focus on basic attacks to build stagger. You don’t have access to secondary forms or special abilities during this first encounter, so customize your talents to boost either damage or critical chance. If you’ve earned talent points, spend them on damage-boosting talents before entering the arena.
If You’re Under-Geared: You can’t really be under-geared for the Artist fight since it’s a mandatory story encounter with no optional upgrades. However, if you’re struggling, make sure you’re dodging at the last moment (not early) and that you’re collecting health elements from the ground. Don’t skip health pickups; they’re your lifeline.
Troubleshooting & Common Mistakes#
- Dodging Too Early: You dodge, but the projectile still hits you. Fix: Wait longer. Dodge when the projectile is nearly upon you, not when the wind-up begins. Your dodge’s invincibility frames are short, so timing is critical.
- Getting Hit by the Long Wind-Up Attack: The boss performs a long wind-up and you try to dodge toward it or dodge too early. Fix: Back away to create space, then dodge away from the boss’s facing direction. Respect the tracking and don’t try to dodge through it.
- Running Out of Health: You’re one hit away from death and don’t see a health pickup. Fix: Stop attacking and move toward the nearest health element. The boss will attack again, so be ready to dodge while moving. Don’t panic-attack when low on health.
- Stagger Meter Not Filling: You’re attacking, but the stagger meter is barely moving. Fix: Keep attacking consistently. The stagger meter fills with every hit; if you’re backing away too much, you’re not attacking enough. Close the distance between dodges and land multiple hits per safe window.
- Missing the Execution Window: The stagger meter fills, but you don’t trigger the execution in time. Fix: The execution window is brief. As soon as the meter fills, press the execution button (likely L3). Don’t wait; the boss will begin attacking again and you’ll miss the window.
- Losing Track of Health Elements: You can’t find health pickups on the ground. Fix: Look at the lower left of your screen where your health bar is displayed. Health elements are small objects that match the color of your health bar. Scan the arena floor around the boss and in corners.
- Getting Cornered: The boss pushes you into a wall or corner and you can’t dodge away. Fix: Use your dash or movement ability to create space. The game gives you a double jump and dash abilities early on; use these to reposition if the boss corners you.
- Taking Unnecessary Damage During Approach: You close the distance to attack, but the boss attacks before you reach it. Fix: Wait for the boss to finish its attack animation before closing in. Don’t run straight at the boss; approach during its recovery window after you dodge.
Advanced Tips & Time Saves#
Abuse the Stagger Meter: The stagger meter is the fastest way to deal damage in this fight. Focus on building it rather than landing random hits. Once you understand the attack pattern, you can predict safe windows and consistently build stagger without taking damage.
Use Your Movement Abilities: The game gives you a double jump and dash early on. During the Artist fight, use these to reposition quickly or create distance when the boss’s attack pattern becomes unpredictable. Don’t rely only on dodging; movement abilities are faster and safer.
Health Element Priority: Large health elements (as opposed to small drops) restore more health. If you see one, prioritize moving to it over attacking. The transcript shows you struggling when ignoring health pickups, so treat health as a resource to manage actively.
Learn the Tell for the Tracking Attack: The long wind-up attack is the most dangerous. Learn to recognize its animation so you can immediately back away. Once you know the tell, you can predict it and never get caught off-guard.
FAQ#
How do I dodge the Artist boss’s projectile attacks in Control Resonant?#
Dodge at the last moment when the projectile is nearly upon you, not when the boss begins its wind-up animation. Stand still or move slightly, then press your dodge button only when the projectile is about to hit. Your dodge’s invincibility frames are short, so early dodges won’t protect you. The transcript shows you succeeding consistently once you wait longer to dodge.
What is the stagger meter and how do I fill it during the Artist fight?#
The stagger meter is a small bar at the bottom of your screen that fills as you deal damage to the boss with your equipped form’s attacks. When it reaches full, the boss becomes vulnerable and you can trigger an execution for a large chunk of damage. Keep attacking between dodges to build stagger consistently, and trigger the execution as soon as the meter fills.
Where do I find health elements during the Artist boss fight?#
Health elements drop from the boss as you damage it, and larger pickups are scattered around the arena floor. Look at the lower left of your screen where your health bar is displayed; health elements match that color. Move to these pickups when your health is low. Don’t skip them—they’re your primary way to stay alive.
Can I parry the Artist boss’s attacks in Control Resonant?#
No, Control Resonant doesn’t have a parry system. You can only dodge attacks by rolling away. The game is built around dodging and positioning, not blocking or parrying, so focus entirely on your dodge timing and movement to avoid damage.
What should I do if I keep dying to the Artist boss?#
Check your dodge timing—you’re likely dodging too early. Wait until the projectile is nearly upon you before dodging. Also, collect health elements from the ground; don’t ignore them. Finally, focus on building the stagger meter and triggering executions rather than landing random hits. The execution deals the most damage and is your fastest path to victory.
What do I unlock after defeating the Artist boss?#
After the fight, you gain new combat abilities to choose from (such as Barrage, Volatile, or Shield) and talent points to spend at the gap. You’ll also unlock the ability to progress further into the story and access new zones. The game shows you a loadout screen where you can customize your abilities and talents before continuing.
Checklist#
- Enter the Artist arena and observe the boss’s health bar and arena layout.
- Close the distance to the boss and begin attacking with your equipped form.
- Watch for the boss’s projectile wind-up animation and dodge at the last moment (not early).
- After dodging, close in and land 2–3 basic attacks during the boss’s recovery window.
- Build the stagger meter by attacking consistently between dodges.
- When the stagger meter fills, immediately trigger an execution for major damage.
- Collect health elements from the ground when your health is low; prioritize larger pickups.
- Recognize the long wind-up attack, back away to create space, and dodge away from the boss’s facing direction.
- Repeat the cycle of dodging, attacking, building stagger, and executing until the boss’s health reaches zero.
- After the fight, choose a new combat ability and spend any earned talent points at the gap.
- Proceed through the story and unlock access to new zones and progression.
- Return to the gap or field office to customize your loadout and prepare for the next encounter.
Source & credit#
This guide draws on the excellent video walkthrough by theRadBrad — watch it for the full visual run-through, and give the creator your view:
https://www.youtube.com/watch?v=_KOpeis0mi4Following Control Resonant? Get an email when we publish a new guide — or update one after a patch.