30-Second Quick-Start (TL;DR)#
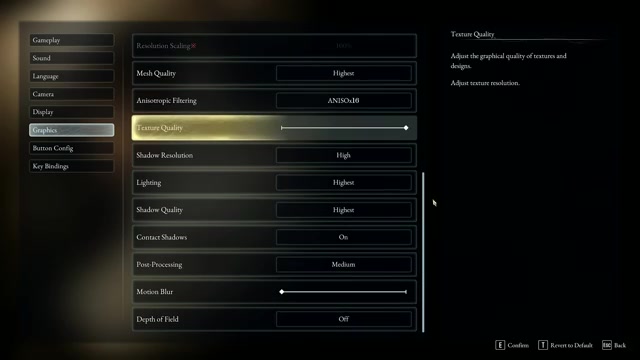
- Force DLSS Preset K (or L/M if you’ve a newer RTX card, though not recommended for this game)
- Set Post Processing to Low to disable Film Grain and Chromatic Aberration
- Disable Ray Tracing entirely (minimal visual gain, up to 7% performance cost)
- Set Texture Quality to 3/3 and VRAM Limit to 1/2 on 8GB GPUs
- Use High for Mesh Quality (3–6% performance cost)
- Set Shadow Resolution to Medium (8–14% performance cost at High)
- Set Lighting to Medium (6–17% performance cost at Highest)
- Expect ~27–30% performance gain over Highest preset at 1440p
What This Guide Helps You Do#
This guide walks you through configuring Beast of Reincarnation’s graphics and performance settings to hit the sweet spot between visual quality and stable frame rates on your hardware. You’ll learn which settings actually matter, which ones to disable entirely, and how to force better upscaling options the game doesn’t expose by default. This is essential if you’re playing on a mid-range GPU (like an RTX 3060 Ti) and want to maintain 60 FPS at 1440p without sacrificing image clarity—especially if you’re frustrated by the game’s limited graphics menu.
Requirements & Prep#
You’ll need a copy of Beast of Reincarnation and access to its graphics settings menu. The recommendations here are tuned for an RTX 3060 Ti at 1440p, but the principles apply to any GPU running Unreal Engine 5. If you’ve got 8GB VRAM, the VRAM Limit setting becomes critical; with 12GB or higher, you’ve got more flexibility. The good news: all changes happen directly in the game’s settings menu—no external tools or .ini file edits required, which is a major advantage over some other recent UE5 titles.
If you’re using an older RTX card (pre-RTX 30-series), you’re limited to DLSS Preset E, which is the CNN-based fallback. Newer RTX 40-series cards can experiment with Preset L or M, though the transcript notes these increase Lumen noise noticeably in Beast of Reincarnation specifically.
Route Overview#
Beast of Reincarnation ships with a limited graphics menu and an outdated version of DLSS, which means the default settings leave significant performance and image quality on the table. The core strategy is threefold: first, force a better DLSS preset than the game defaults to; second, disable the post-processing effects (Film Grain and Chromatic Aberration) that degrade image quality without meaningful artistic benefit; third, selectively disable or lower the most demanding settings (Ray Tracing, Shadow Resolution, Lighting) that provide minimal visual return. The remaining settings—Mesh Quality, Texture Quality, and VRAM Limit—are tuned to preserve visual fidelity while staying within reasonable performance budgets. The end result is a configuration that delivers approximately 27–30% better frame rates than the Highest preset while maintaining sharp, clean visuals.
Step-by-Step Walkthrough#
Launch the game and access Graphics Settings#
Start Beast of Reincarnation and navigate to the graphics or video settings menu. You’ll notice the menu is sparse compared to earlier Unreal Engine 5 titles—that’s intentional on the developer’s part, but it also means you’ve got fewer granular controls. Don’t worry; the settings that are there have outsized impact if tuned correctly.
Configure Upscaling (DLSS or FSR)#
This is the single most impactful change you can make. The game ships with DLSS enabled by default, but it uses an outdated CNN-based Preset E, which produces softer images and loses motion clarity. If you’ve got an RTX card, you need to force a newer DLSS preset. Unfortunately, the game doesn’t expose this option in the menu, so you’ll need to force it through your GPU driver or a third-party tool like NVIDIA Control Panel or GeForce Experience.
The recommended setting is DLSS Preset K, which provides noticeably better motion clarity than Preset E. If you own a newer RTX 40-series card, you can experiment with Preset L, but the transcript explicitly warns against Preset M in Beast of Reincarnation—it significantly increases Lumen noise and boiling artifacts, making the game look worse despite being theoretically “newer.”
If you don’t have DLSS available or prefer to stay within the game’s native menu, the next-best option is FSR 4 if your GPU supports it. If neither is available, TSR (Temporal Super Resolution) is the fallback. TSR is slower than FSR 3 but delivers a sharper and more stable image. Both TSR and TAAU Balanced render at nearly the same internal resolution as DLSS Quality, so they’re reasonable alternatives.
Set the upscaling quality to Ultra Quality (equivalent to DLSS Quality mode). This balances image sharpness with performance gains.
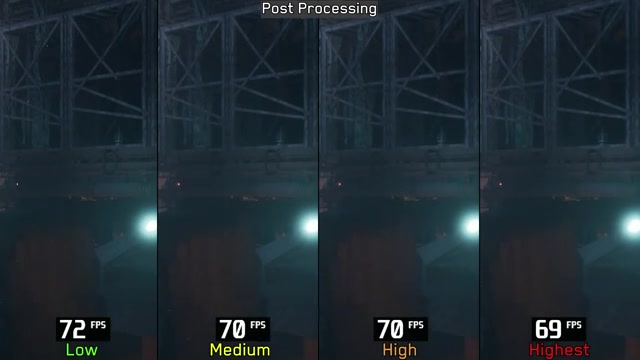
Lower Post Processing to Disable Film Grain and Chromatic Aberration#
This is the second-most impactful change. Beast of Reincarnation suffers from aggressive Film Grain and Chromatic Aberration effects that, when combined, make the game look like it’s rendering at a lower resolution than it actually is. The game doesn’t let you disable these effects individually—they’re bundled into the Post Processing setting.
Set Post Processing to Low. This disables both Film Grain and Chromatic Aberration in one move, resulting in a much cleaner, sharper image. You’ll also gain a noticeable performance improvement. Unlike Halo: Infinite’s campaign, which forced these effects and required .ini file edits to disable, Beast of Reincarnation lets you turn them off directly in the menu.
Disable Ray Tracing#
Ray Tracing in Beast of Reincarnation is a trap. The visual impact is minimal—shadows, reflections, and global illumination look virtually identical with it enabled or disabled. In some areas, enabling Ray Tracing actually makes things worse; for example, it completely disables Screen Space Reflections (SSR) without providing a meaningful replacement. In other areas, it adds minor reflection detail to rough materials, but the cost isn’t worth it.
Performance-wise, Ray Tracing typically costs 2–7% frame rate, and in some scenes it can spike higher. Set Ray Tracing to Off and don’t look back. You won’t miss it, and you’ll gain tangible frame rate in return.
Set Texture Quality and VRAM Limit#
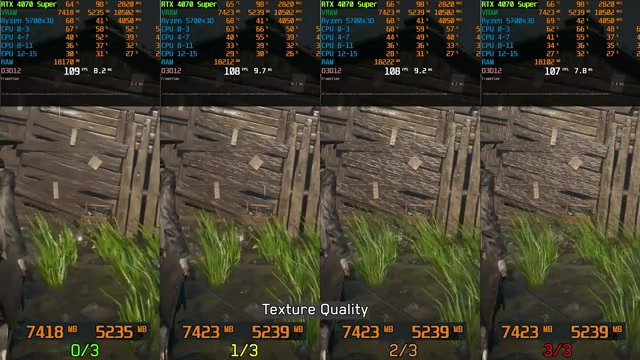
These two settings work together but control different things. Texture Quality controls the resolution and quality of textures and assets themselves; it doesn’t significantly impact VRAM usage. VRAM Limit controls how much video memory is allocated to texture streaming—this is the setting that actually affects VRAM consumption.
For an 8GB GPU like the RTX 3060 Ti, set Texture Quality to 3/3 (Highest) and VRAM Limit to 1/2. The 2/2 VRAM Limit option frequently pushes VRAM usage close to or past the 8GB limit, causing stuttering and texture pop-in. The 1/2 setting is the sweet spot—it keeps VRAM under control while maintaining visual quality. If you’ve got 12GB or more VRAM, you can experiment with higher VRAM Limit settings, but 1/2 is the safe default.
Set Mesh Quality to High#
Mesh Quality controls the level of detail of the game’s geometry, primarily affecting foliage like grass and trees. Higher options allow these elements to retain more detailed models both up close and at distance. The performance cost is modest: roughly 3% from Low to High, and about 6% from High to Highest.
Set Mesh Quality to High. This preserves visual detail in outdoor areas without the extra 3% performance hit of Highest. The difference between High and Highest is subtle enough that High is the better value.
Set Shadow Resolution to Medium#
Shadow Resolution controls the resolution of the game’s shadow maps. This is one of the most demanding settings in the game. The performance cost scales aggressively: there’s a small gap between Low and Medium, but jumping to High costs around 8% frame rate in typical scenes, and can spike to 14% in shadow-heavy areas.
Set Shadow Resolution to Medium. This provides a good balance of shadow quality and performance. The difference between Medium and High is visible but not dramatic, and the performance savings are substantial enough to be worth the trade-off.
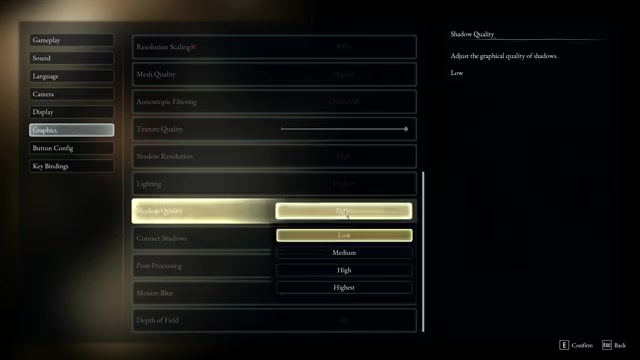
Set Shadow Quality to High or Highest#
Shadow Quality is separate from Shadow Resolution. It controls the quality of shadow filtering (how soft or hard the shadow edges are). Unlike Shadow Resolution, Shadow Quality has minimal performance impact, so you might as well use Highest for the slight visual improvement.
Set Shadow Quality to High or Highest.
Set Lighting to Medium#
Lighting primarily affects volumetric lighting effects (god rays, light shafts through fog, etc.). Low disables it entirely, while Medium, High, and Highest all keep it enabled. Visually, there’s no noticeable difference between Medium, High, and Highest—they all look the same.
However, the performance cost is significant: Highest carries a 17% performance hit in typical scenes, while High costs around 6%. Since Medium and High are visually identical, there’s no reason to pay the extra 11% performance penalty.
Set Lighting to Medium. You get volumetric lighting without the excessive performance cost of High or Highest.
Leave Other Settings at Default#
The remaining graphics settings—resolution, field of view, motion blur, and others—either don’t have meaningful performance impact or aren’t detailed in the transcript. Leave them at your preferred defaults. The settings covered above are the ones that actually matter for frame rate and image quality in Beast of Reincarnation.
Troubleshooting & Common Mistakes#
- Game looks blurry or soft: You’re likely using DLSS Preset E (the default). Force Preset K through your driver settings for sharper motion clarity.
- Image has visible grain and color fringing: Post Processing is set too high. Lower it to Low to disable Film Grain and Chromatic Aberration.
- Frequent texture pop-in or stuttering: VRAM Limit is set too high for your GPU. Drop it to 1/2 if you’ve got 8GB VRAM.
- Shadows look jagged or pixelated: Shadow Resolution is set to Low. Raise it to Medium for better quality (the performance cost is worth it).
- Game looks unnaturally dark in indoor areas: This is a known issue with Beast of Reincarnation’s Lumen implementation at low resolution. It’s not a setting you can fix, but it’s not your configuration.
- Shader stuttering on first launch: This is normal. The game compiles shaders on startup and when loading new levels. This behavior was limited to the prologue in testing; if it persists in later areas, it’s a bug.
- Ray Tracing looks good to me; should I enable it?: It’s your choice, but the transcript shows it costs 2–7% frame rate for minimal visual gain. In some areas it actually makes reflections worse. Unless you’re already getting 100+ FPS, it’s not worth it.
- Can I use higher VRAM Limit on my 12GB GPU?: Yes, experiment with 2/2 or higher if you’ve got the VRAM. Just monitor your actual VRAM usage in-game to avoid stuttering.
Performance Benchmarks & Expected Results#
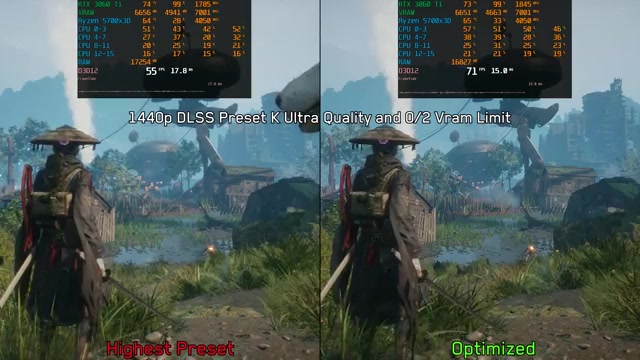
Using the optimized settings outlined above (DLSS Preset K at Ultra Quality, Post Processing Low, Ray Tracing Off, Texture Quality 3/3, VRAM Limit 1/2, Mesh Quality High, Shadow Resolution Medium, Shadow Quality High, Lighting Medium) on an RTX 3060 Ti at 1440p, you can expect approximately 27–30% better frame rates compared to the Highest preset.
In typical outdoor scenes, the optimized settings deliver around 27% more performance. In action-heavy scenes with more geometry and lighting, the gap widens to roughly 30%. On an RTX 3060 Ti, this translates to a stable 60 FPS at 1440p with DLSS Preset K, whereas the Highest preset would dip below 50 FPS in demanding areas.
The exact frame rate you achieve depends on your specific GPU, CPU, and the scene you’re in, but the relative improvement should be consistent across hardware. If you’ve got a more powerful GPU (RTX 4070 or higher), these settings will net you higher absolute frame rates or allow you to increase some settings further.
FAQ#
Should I force DLSS Preset L or M instead of K?#
No, stick with Preset K for Beast of Reincarnation. The transcript explicitly warns that Preset L and especially M significantly increase Lumen noise and boiling artifacts, making the image quality worse despite being theoretically newer. Preset K provides the best motion clarity without these downsides. If you’ve got an older RTX card that doesn’t support Preset K, you’re stuck with Preset E, but upgrading to a newer card would give you access to better upscaling.
What’s the difference between Texture Quality and VRAM Limit?#
Texture Quality controls the resolution and quality of the textures themselves and doesn’t significantly affect VRAM usage. VRAM Limit controls how much video memory is allocated to texture streaming. On an 8GB GPU, setting VRAM Limit to 1/2 keeps memory usage under control and prevents stuttering, even with Texture Quality at 3/3. Think of it this way: Texture Quality is what textures look like; VRAM Limit is how much memory the game can use to load them.
Why does Ray Tracing look bad in Beast of Reincarnation?#
Ray Tracing in this game is poorly implemented. It disables Screen Space Reflections (SSR) without providing a meaningful replacement, so reflections can actually look worse with it enabled. In other areas, it adds minor detail to rough materials but at a 2–7% performance cost that isn’t justified by the visual gain. The game’s overall lighting is handled by Lumen, which doesn’t benefit much from Ray Tracing in this particular implementation.
Can I run these settings on a lower-end GPU like an RTX 2080 or GTX 1080 Ti?#
The transcript doesn’t provide specific benchmarks for older GPUs, but the optimized settings are designed to be scalable. Start with these settings and lower Mesh Quality to Medium or Low, and Shadow Resolution to Low if you’re not hitting your target frame rate. You may also need to drop to 1080p resolution or use a lower DLSS quality mode. The core principles—disable Ray Tracing, lower Post Processing, set Lighting to Medium—apply regardless of GPU.
Is Post Processing set to Low really that much better than High?#
Yes. Film Grain and Chromatic Aberration, when combined, make the game look like it’s rendering at a lower resolution than it actually is. Disabling them (via Post Processing Low) results in a noticeably cleaner, sharper image. You also gain a performance improvement as a bonus. This is one of the highest-impact changes you can make to image quality.
Should I use FSR 4 instead of DLSS?#
If your GPU supports FSR 4, it’s worth trying. FSR 4 is newer and can provide sharper results than DLSS in some cases. However, the transcript doesn’t provide direct comparisons between FSR 4 and DLSS Preset K in Beast of Reincarnation, so DLSS Preset K remains the recommended option based on the testing shown. If you don’t have DLSS, FSR 4 is your next-best choice, followed by TSR.
Checklist#
- Launch Beast of Reincarnation and open Graphics Settings
- Force DLSS Preset K through your GPU driver (or Preset L if you’ve got a newer RTX card, but not Preset M)
- Set upscaling quality to Ultra Quality (DLSS Quality mode)
- Set Post Processing to Low to disable Film Grain and Chromatic Aberration
- Set Ray Tracing to Off
- Set Texture Quality to 3/3 (Highest)
- Set VRAM Limit to 1/2 (or higher if you’ve got more than 8GB VRAM)
- Set Mesh Quality to High
- Set Shadow Resolution to Medium
- Set Shadow Quality to High or Highest
- Set Lighting to Medium
- Launch a level or benchmark and verify you’re hitting your target frame rate (60 FPS at 1440p on RTX 3060 Ti is the baseline)
- If frame rate is still below target, lower Mesh Quality to Medium or Shadow Resolution to Low
- If frame rate is well above target, you can experiment with raising Shadow Resolution to High for better shadow quality
Source & credit#
This guide draws on the excellent video walkthrough by BenchmarKing — watch it for the full visual run-through, and give the creator your view:
https://www.youtube.com/watch?v=ECkPGoeYYIcFollowing Beast of Reincarnation? Get an email when we publish a new guide — or update one after a patch.