- Medium
- Difficulty
- 14 min
- Read time
- 17
- Steps
- 1.0
- Checked on

30-Second Quick-Start (TL;DR)
Get through The Mermaid Mask by following this core sequence:
- Read the case file at the Stone Top Inn and examine the book Sally brought
- Investigate the town square statue and theater billboard for achievement progress
- Board the Mortuga submarine and explore the crime scene in the Illusion Theater
- Solve the serpent statue puzzle in the main corridor to unlock the cabinet
- Question all suspects: Symmetry, Cynthia, Dr. Zephr, and others
- Complete puzzles in the child’s room (card and lens puzzle) and control room (wire puzzle)
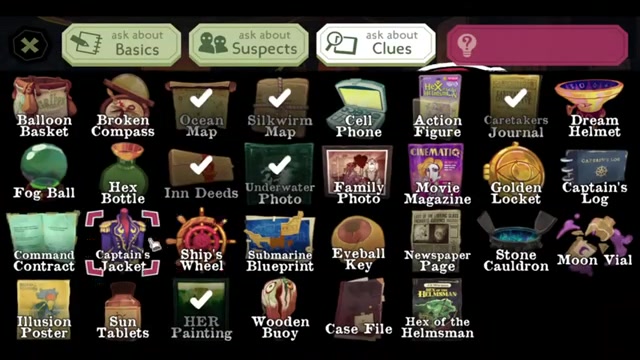
- Examine clues including the command contract, captain’s log, and family photo
- Unlock Symmetry’s locket and find the underwater photo in the bunk room safe
- Read the letter under Cynthia’s mattress to uncover the mermaid connection
- Deduce that Magnus Mortuga was killed by something inside the cauldron he unlocked

What This Guide Helps You Do
This guide walks you through The Mermaid Mask from start to finish, helping you solve the murder of Captain Magnus Mortuga aboard the Mortuga submarine, complete all puzzles, find every clue, and uncover the mystery of the mermaid. You’ll learn where to go, what to examine, how to solve each puzzle, and what each suspect reveals during interrogation. It’s best for players experiencing The Mermaid Mask for the first time, or those stuck on specific puzzles or story beats.
Requirements & Prep
The Mermaid Mask is a narrative detective game that doesn’t require any special items or preparation before starting. The game works as a point-and-click adventure—you’ll click on objects to examine them and select dialogue options to question suspects. There’s no combat or timed sequences. If you haven’t played the first game (Detective Grimmoir and Sally’s previous case), don’t worry. The Mermaid Mask stands alone as a mystery.
Route Overview
The Mermaid Mask unfolds in a logical sequence. You start at the Stone Top Inn, where you receive a case file explaining that Captain Magnus Mortuga has been murdered aboard the Mortuga submarine. After exploring the town and gathering initial clues, you board the submarine and make your way to the crime scene—the Illusion Theater—where Mortuga’s body lies in or near a locked cauldron. From there, you explore the submarine’s various rooms: the child’s room (where Symmetry lives), the bunk room (shared by Symmetry and Cynthia), the control room (where Cynthia works), the dream chamber (Dr. Zephr’s workspace), and others. Along the way, you’ll solve environmental puzzles, examine objects for clues, and question each suspect about their whereabouts and knowledge of the murder. The mystery hinges on understanding what was inside the cauldron, why it was locked, and who had the motive and opportunity to kill Mortuga.
Step-by-Step Walkthrough
The Stone Top Inn: Gather the Case File and Initial Context
You start inside the Stone Top Inn at 4 in the morning. Sally’s asleep on a bench. Look at the book she brought—it’s titled Acts of the Helmsman by J.D. Worman. She’s read through it multiple times, though the reason isn’t immediately clear. The case file sits on the bar. Read it carefully: it tells you that Captain Magnus Mortuga, age 39, has been found dead in the Illusion Theater aboard the Mortuga submarine. The location is described as “mostly empty” except for an ancient stone cauldron with a thick metal lid. The case file is signed by Captain Seafo, who hired Detective Grimmoir and Sally to solve the case.
After reading the case file, an eerie green light appears outside. Wake Sally and head outside to investigate. You’ll see the light’s coming from a wooden buoy on the submarine’s deck—a boy-shaped lighthouse that lures people in rather than warning them away. The buoy’s green light fades as you approach.
The Town Square: Examine the Statue for Achievement Progress
Before boarding the submarine, take time to explore the town. In the town square, you’ll find a large stone statue on top of a fountain depicting a fisherman wrestling with a serpent-like creature. The plaque reads “The Silkworm Serpent.” Examine this statue—it’s the first of four required for the Silver Snake Sleuth achievement. Make note of it, as you’ll need to find three more statues throughout the game.
The Submarine Deck: Examine Key Objects
Once you’re on the submarine’s deck, look at several important objects before heading inside. The wooden buoy is your first clue that something unusual is happening on this vessel. The rowboat is old and damaged, with a name that’s been crossed out and replaced: it originally said “Seafo” but now reads “Mortuga.” This suggests a possible mutiny or change of command. The submarine door is already open, indicating that someone opened it after the vessel surfaced.
The Main Corridor and Serpent Puzzle: Unlock the Cabinet
Head down the ladder into the submarine’s interior. You’ll pass a painting of an unknown being in an ornate wooden frame with the word “Her” on a brass plaque. This painting is important—note it for later. The control room door is locked and taped shut from the inside, so you can’t enter yet. Captain Seafo’s voice directs you toward the crime scene one floor down at the back of the submarine.
In the main corridor, you’ll encounter a large metal statue of a serpent with a locked cabinet built into it. This is the second statue for the Silver Snake Sleuth achievement. To open the cabinet, you must rotate four dials to match a specific pattern. The puzzle requires you to arrange the dials so that:
- Top dial: Triangle (representing 3)
- Bottom dial: Triangle (representing 9 when combined with other elements)
- Left dial: Triangle (representing 7)
- Right dial: Square (representing 4)
This puzzle is trickier than it looks because the symbols on each dial combine to create numbers. Rotate the dials carefully until you match the required arrangement. Once solved, the cabinet opens and yields sun tablets—a key item for progressing to the crime scene.
The Illusion Theater: Examine the Crime Scene
Now you can proceed to the Illusion Theater, where Captain Mortuga’s body lies. This room has been rebranded as a theater, with a banner bearing its name and a curtain that can be drawn across the middle. Several important clues are scattered throughout:
- The upside-down poster: A drawing of a figure labeled “Lady of the Looking Glass” has been pinned to the wall upside down. This is significant—someone either hung it that way intentionally or it was turned during the struggle.
- The overturned stool: A wooden stool lies on its side. It’s identical to the bar stools at the Stone Top Inn, suggesting it came from there.
- The blood trail: A trail of blood runs from Mortuga’s neck wound toward the back of the room, then hesitates and changes direction—a sign that Mortuga moved after being wounded or that something else happened.
- The broken vial: A small vial with a moon symbol on its label lies near the body. Mortuga likely dropped this when he died.
- The cauldron: The ancient stone cauldron sits at the back of the room. It’s now unlocked and open—the case file stated it’d never been unlocked before, making this a critical clue. Mortuga’s body lies on its back with the cauldron at his feet. He was killed by a cut across the neck.
Examine the interior of the cauldron closely. You’ll notice scratch marks inside—evidence that something was clawing or moving inside before the cauldron was opened. The cauldron appears empty now, but the scratches suggest that whatever killed Mortuga came from inside this locked vessel.
First Deduction: The Murder Weapon Came from Inside the Cauldron
Based on the evidence, make your first major deduction: Magnus Mortuga unlocked the cauldron (which had never been unlocked before), and something inside—not a person, but something dangerous—killed him by cutting his neck. The scratch marks inside the cauldron confirm that something was trapped or kept inside. The weapon itself is missing, but the wound is consistent with a sharp blade. This deduction unlocks the next chapter and allows you to explore other areas of the submarine.
The Child’s Room: Solve the Card and Lens Puzzle
Head to the child’s room, located directly beside the Illusion Theater. This is where Symmetry, an illusionist and performer, lives. Before speaking to her, examine the objects in the room:
- The newspaper: A page from a newspaper sits on a table. Read it to earn progress toward the Silver Snake Sleuth achievement. It contains articles and advertisements from the town.
- The self-portrait: A painting of a girl standing in the woods hangs on the wall. Symmetry will later reveal that this is actually her, not just a painting—she’s been standing perfectly still the entire time you’ve been in the room, posing as artwork.
- The wooden chest: A locked chest sits at the foot of the bed with cards and lenses on top. This puzzle requires you to align cards and lenses so that each girl’s head sits directly above the correct door below.
To solve the chest puzzle, you must move the cards and lenses to match the rule printed on the back of the cards. The goal is to line up each girl’s head so it appears above a specific door. Rotate and slide the pieces until all three girls are correctly positioned. Once solved, the chest opens to reveal a strange glass object that smells musty and unpleasant.
Questioning Symmetry: The Illusionist’s Story
After examining the room, speak with Symmetry. She reveals herself as an illusionist and performer who’s been practicing magic since age 12 (she’s now 18). She performs stage magic with props, smoke, mirrors, crates, cages, doors, and doubles. When questioned about the painting, she admits it’s a self-portrait—she was standing still the entire time, posing as art. She claims the upside-down poster in the Illusion Theater was hung right-side up by her, but someone else must have turned it.
Symmetry is evasive about many topics. She refuses to explain what the wooden buoy is, saying it’s not her place to comment on things in “Chamber Dream” (Dr. Zephr’s space). She’s obsessed with curses, magic, and the paranormal, and wears a golden locket that she’s reluctant to discuss. When pressed about the night of the murder, she becomes emotional, admitting she was awake and upset about her magic act failing.
The Murder Night: Symmetry’s Account
Through a flashback sequence, you learn what Symmetry witnessed on the night Mortuga died. She lay awake in bed, restless and wrought with guilt. Cynthia (her bunkmate) woke suddenly when the submarine made an unscheduled maneuver—it was surfacing. Cynthia asked Symmetry what was wrong, and Symmetry mentioned her magic act had gone wrong. Cynthia suggested she take it down and try again later. After Cynthia left for the control room, Symmetry got up and went to the Illusion Theater, where she discovered Mortuga’s body. She screamed, and several crew members came running. She also saw a large face passing by the window outside the submarine—a mysterious detail that remains unexplained.
The Control Room: Examine Clues and Solve the Wire Puzzle
Once Cynthia (the new captain) grants you access to the control room, examine several important objects before questioning her:
- The submarine blueprint: A detailed schematic of the Mortuga submarine showing its layout and systems.
- The ship’s wheel: The large wooden wheel used for steering. Don’t touch it.
- The captain’s jacket: A shiny, historically significant jacket displayed on a wooden mannequin behind glass. It’s the captain’s control chair, not a throne. Notably, it’s a half-jacket—Mortuga didn’t wear anything on his right shoulder due to an old injury.
- The command contract: A document taped to the back of the mannequin representing an agreement between two individuals in contention over ownership and command of the submarine.
- The control panel: The main navigation and control system of the submarine.
To progress, you must complete two tasks at the control panel. First, pull both the red and yellow levers to earn the “Lever Lover” achievement. Second, solve the wire puzzle by moving colored plugs (red triangle, yellow circle, blue square) into the correct numbered sockets to create an image matching the post-it note attached to the panel. The correct arrangement is:
- Red triangle wires: Sockets 1 and 12
- Yellow circle wires: Sockets 4 and 6
- Blue square wires: Sockets 7 and 11
Once you match the image on the post-it note, the puzzle unlocks a hatch containing the captain’s log—a ring-bound book recording the submarine’s daily movements and notable events.
Questioning Cynthia: The New Captain’s Testimony
Cynthia Seafoam is the new captain of the submarine. She’s 18 years old and came to the submarine by rowboat several weeks before Worman and Dansom arrived. She has 15 years of experience as a nautical engineer and shipyard mechanic—a family business in Silkworm. Her mother was the harbor master with naval officer ambitions, and her stepfather still lives in the town. Her mother is deceased. Cynthia came to the submarine specifically to speak with Mortuga about “matters of great importance,” though she refuses to elaborate initially.
On the night of the murder, Cynthia woke when the submarine made an unscheduled maneuver and began surfacing. She felt the bow tilting up (the submarine was in the bow section). She noticed Symmetry was awake and upset about her magic act, then went to the control room to investigate. The control room was empty, but she saw the ship’s compass was malfunctioning. She pulled it from its socket to take it for repairs. In the parlor, she encountered Dr. Zephr carrying a small empty bottle made of green glass. She went to the engine room to give the compass to Mr. Grip, who said he had replacement needles. Then Madame Tadpole called her to the storage room upstairs, where she discovered Mortuga’s body.
After the discovery, Cynthia went back to the control room to look for the captain’s instructions and read the captain’s log. She took several sheets of paper and the logbook. Symmetry was the last person to see Mortuga alive, and Cynthia was protective of her, removing her from the crowd when suspicion began to fall on her.
When asked about the captain’s log, Cynthia reveals that it’s a daily record where the captain prints readings from the submarine’s movements and signs off on events. The card on top is from the day Mortuga died and is signed by both Mortuga and Cynthia—a detail that seems suspicious, as Mortuga died that day. Cynthia insists it’s binding because they both signed it.
Regarding the upside-down poster, Cynthia says she’s considering having it taken down because it makes the crew uncomfortable. When asked about the wooden buoy, she mentions that it lures people in with a green light that “just kind of happens”—it’s not activated from the control room, suggesting it may be magical or autonomous.
The Bunk Room: Puzzles and Family Secrets
With access to the control room granted, you can now enter the bunk room shared by Symmetry and Cynthia. Before questioning them further, examine:
- The movie magazine: A recent magazine that earns you the “Break Time” achievement when read.
- The family photo: A framed photograph hung from a pipe, visible from the bed. It shows Cynthia with her mother (the harbor master in a fancy naval jacket) and her stepfather. This is the fourth and final statue/photo needed for the Silver Snake Sleuth achievement.
- The piggy bank: A ceramic pig-shaped safe with a numbered panel on the back. To open it, you must rotate the pig and adjust the face features on the front so that the white numbers add up to the red numbers in each column and row. Once solved, it contains an underwater photograph.
When you ask Cynthia about the family photo, she reveals that her mother was the harbor master with big ambitions but that they drifted apart over time. Her stepfather is still in Silkworm. When asked about the underwater photograph in the safe, Cynthia becomes uncomfortable. She admits that on the night of the murder, while in the control room alone, she couldn’t resist using the submarine’s underwater imaging system. The photograph that emerged disturbed her so much that she locked it in the safe to avoid thinking about it.
Ask Cynthia if she opened Symmetry’s golden locket. She says she didn’t and respects Symmetry’s right to have secrets. She seems genuinely concerned about what might be inside.
Symmetry’s Golden Locket: Unlock the Achievement
Return to Symmetry and ask if you can examine her locket more closely. She agrees but asks you to be careful. Open it to earn the “A Witch of Some Infamy” achievement. Inside is a disturbing image—the exact nature of which is left ambiguous, but it clearly disturbs both detectives. Symmetry is reluctant to discuss what it is, saying she’s heard the voice of the figure inside only at night when half asleep.
Checking Under Cynthia’s Mattress: The Letter from Felicia
After learning about the underwater photograph, return to the bunk room and look under Cynthia’s mattress. You’ll find a letter from someone named Felicia Stone Top (the innkeeper from the Stone Top Inn). The letter reveals crucial information:
“As for our cargo, the bell and the bio are in my room, and I’ve returned the mermaid’s tongue to its resting place. Please try not to dwell on it, Magnus. I have to leave Silkworm tonight. I’m giving you the inn. It is in your name now. Hopefully, I’ll see you again, Felicia.”
This letter confirms that Mortuga and Felicia had a close relationship, that Mortuga now owns the Stone Top Inn, and most importantly, that there’s something called “the mermaid’s tongue” that was returned to “its resting place.” This is a major clue connecting the underwater photograph, the cauldron, and the murder.
The Dream Chamber: Dr. Zephr’s Testimony
Head to the dream chamber (Dr. Zacharias Zephr’s workspace) to question the dream doctor. Before speaking to him, examine the fog bowl, dream helmets, and shelf of potions—though he’ll ask you to speak with him first.
Dr. Zephr is a self-proclaimed dream doctor who studies the “parasychological qualities of dreams.” He believes dreams are transmissions of spirit energy from another dimension (the spirit realm or afterlife). He was the first person invited aboard the submarine by Mortuga and joined shortly before the maiden voyage. When Mortuga first acquired the submarine, he told Zephr only that he’d acquired it and would be living in it for an undisclosed time—no other explanation.
Zephr is obsessed with studying “the mermaid”—a being known only by that name, of which he knows very little. He believes analyzing her “transmission” would be an unparalleled discovery. He’s interested in Symmetry because a newspaper review of her magic show at Fortuna Hall Theater suggested a connection to the “ethereal plane.” He attended her performance and later requested an audience, learning that she shared his fascination with metaphysical questions.
On the night of the murder, Zephr had a vivid dream of a massive face emerging from the black sea, speaking in a forbidden language. He woke to find the room bathed in green light (far more potent than the wooden buoy’s light). He left his chambers to conduct business at the airlock, where he met Cynthia carrying the ship’s compass. She appeared visibly upset. After Cynthia left, Zephr went back to his chambers to store some items, then proceeded to the storage room as Madame Tadpole had requested. There he found Mortuga’s body.
When asked about his credentials, Zephr admits he has no doctorate—eight institutions rejected his ideas as incompatible with the modern world. He acquired a mysterious “specimen” that led him to study dreams and the subconscious mind. He positions himself on the submarine to study “the most important specimen of all”—the mermaid.
Other Suspects and Locations
The game includes other suspects and locations you’ll need to explore: Madame Tadpole, Mr. Grip, Mariana Moon, Dansom, and Worman. Each has their own testimony and connection to the murder. Madame Tadpole was the one who discovered the body and called everyone to the storage room. The engine room, parlor, captain’s cabin (locked), and other areas contain additional clues and context.
The Tangle Tower Achievement
When you question Cynthia about the case file she left at the Stone Top Inn, she mentions reading about Detective Grimmoir’s previous case in a newspaper—the Tangle Tower case. She asks if Fiona (a character from that case) left the tower. You can respond that Fiona and Poppy moved out to a nice place in the countryside. This conversation earns you the “Tangle Tower” achievement, confirming that The Mermaid Mask takes place in the same universe as the previous game.
The Mermaid Mask
Troubleshooting & Common Mistakes
- Stuck on the serpent puzzle: Remember that the dials combine symbols to create numbers. Match the pattern shown in the puzzle description rather than guessing randomly. Take your time rotating each dial one at a time.
- Can’t find Symmetry: She’s posing as a painting in the child’s room. Look carefully at the self-portrait on the wall—if you see her blinking or breathing, you’ve found her. She’ll reveal herself when you speak to her.
- Wire puzzle not matching: The puzzle may randomize. Focus on matching the exact image on the post-it note instead of guessing a pattern. Red triangle goes to sockets 1 and 12, yellow circle to 4 and 6, blue square to 7 and 11.
- Piggy bank puzzle seems impossible: The white numbers on the back must add up to the red numbers in each row and column. Adjust the pig’s face features (eyes, nose, mouth) to change the white numbers until they match.
- Missing clues in the control room: Make sure you examine the blueprint, wheel, captain’s jacket, command contract, and control panel before solving the wire puzzle. The hatch won’t open until the wire puzzle is complete.
- Locked door to control room: Cynthia won’t let you in until you’ve made progress with the suspects. Talk to Symmetry first, then return to Cynthia to ask for access.
- Can’t open Symmetry’s locket: Ask her permission first. She’ll allow you to examine it, and you can then open it for the achievement.
- Forgot to check under the mattress: The letter from Felicia is essential for understanding the mermaid connection. Go back to the bunk room and look under Cynthia’s mattress after you’ve learned about the underwater photograph.
Advanced Tips & Time Saves
If you’re replaying The Mermaid Mask or want to optimize your run, here are some time-saving tips based on the game’s structure:
- Grab all four statue/photo locations early: The Silver Snake Sleuth achievement requires examining the town square statue, the serpent statue in the submarine corridor, the newspaper in the child’s room, and the family photo in the bunk room. You can earn this achievement before solving the main mystery if you’re thorough.
- Talk to Symmetry before entering the control room: This unlocks Cynthia’s willingness to grant you access, saving you from backtracking later.
- Solve the piggy bank puzzle before asking Cynthia about the underwater photo: You’ll need the photo from inside to understand her testimony about using the imaging system.
- Read the letter under the mattress immediately after getting the photo: The connection between the letter, the mermaid, and the underwater photo becomes clear when you read them in sequence.
- Don’t skip Dr. Zephr’s dialogue: His testimony about the green light, his dream, and his obsession with “the mermaid” are essential for understanding the supernatural elements of the case. He talks a lot, but every detail matters.

FAQ
Where do I find the case file in The Mermaid Mask?
The case file is on the bar at the Stone Top Inn at the start of the game. Read it to learn that Captain Magnus Mortuga has been murdered aboard the Mortuga submarine in a room called the Illusion Theater. The case file is signed by Captain Seafo and provides the foundation for the entire investigation.
How do I solve the serpent statue puzzle in The Mermaid Mask?
The serpent statue puzzle requires you to rotate four dials to match a specific arrangement: triangle at the top, triangle at the bottom, triangle on the left, and square on the right. These symbols represent numbers that combine to create the correct pattern. Rotate each dial carefully until the pattern matches, then the cabinet opens to reveal sun tablets.
What’s inside the cauldron in The Mermaid Mask?
The cauldron appears empty when you examine it, but scratch marks inside suggest something dangerous was trapped inside and escaped when Mortuga unlocked it. That something killed Mortuga by cutting his neck. The exact nature of what was inside is connected to “the mermaid” and the underwater photograph, but the game leaves some details ambiguous.
How do I get Symmetry to stop posing as a painting in The Mermaid Mask?
Symmetry is standing perfectly still in the child’s room, posing as a self-portrait on the wall. Simply speak to her or try to interact with the painting, and she’ll reveal herself. She’ll admit she’s been standing there the whole time and explain that she’s an illusionist practicing her craft.
What does the underwater photo show in The Mermaid Mask?
Cynthia used the submarine’s underwater imaging system on the night of the murder and captured a photograph of something in the water. She won’t describe it in detail, only saying it disturbed her enough to lock it in the piggy bank safe. The photo is connected to the mermaid mystery and the items mentioned in Felicia’s letter.
Who is Felicia Stone Top in The Mermaid Mask?
Felicia Stone Top is the innkeeper of the Stone Top Inn where the game begins. A letter from her, hidden under Cynthia’s mattress, reveals that she and Mortuga had a close relationship, that she’s given him ownership of the inn, and that she’s returned “the mermaid’s tongue” to its resting place. This letter is crucial for understanding the mermaid connection to the murder.
Checklist
0 of 24
Source & credit
This guide draws on the excellent video walkthrough by Westraat Gaming — watch it for the full visual run-through, and give the creator your view: