
Unlocking traversal abilities in Hollow Knight: Silksong is the key to fully exploring Pharloom before Act 2. This walkthrough shows you exactly where to find every Act 1 mobility upgrade — Silkspear, Swift Step, Drifter’s Cloak, Cling Grip, and Needolin — with efficient routes, farming spots, and boss strategies. If you’re stuck wondering “How do I unlock wall jump in Silksong?” or “Where is the Silkspear ability?”, this guide has you covered.
30-Second Quick-Start (TL;DR)
Here’s the fastest path if you don’t want the details:
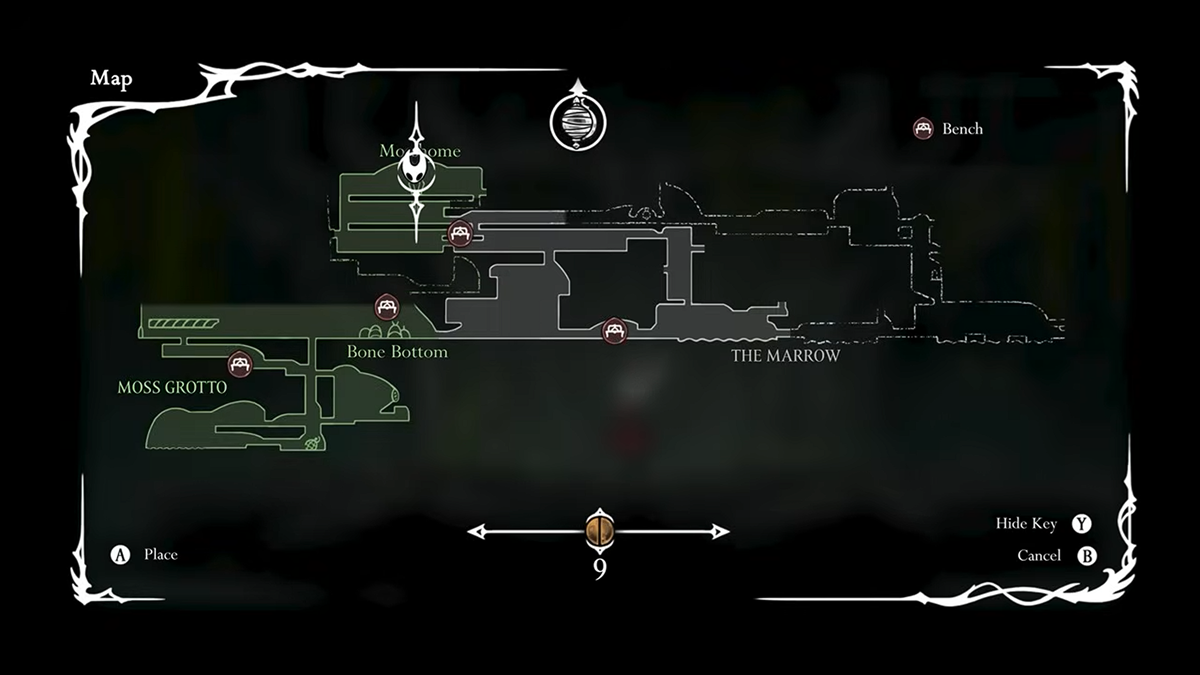
- Rest at Ruined Chapel bench, defeat Moss Mother, and move east to Bone Bottom.
- Enter The Marrow, open shortcuts, and meet Shakra for maps.
- (Optional) Farm Rosaries at Mosshome bench.
- Unlock Silkspear at Moss Grotto altar.
- Use Silkspear to free/defeat Bell Beast → unlock fast travel.
- From Marrow prison, descend into Deep Docks → clear waves → gain Swift Step.
- Return via forge, defeat Lace, push east to Far Fields Seamstress, complete quest → get Drifter’s Cloak.
- Travel west through Greymoor and Shellwood, defeat Moorwing and Sister Splinter, then bind for Cling Grip (wall jump).
- Finally, defeat Widow to bind and unlock Needolin.
Biggest mistake to avoid: skipping benches and shortcut levers before major bosses — they save long runbacks.

What This Guide Helps You Do
This walkthrough teaches you how to unlock every mobility item in Act 1 of Silksong in a single efficient path. You’ll collect Silkspear, Swift Step, Drifter’s Cloak, Cling Grip, and Needolin, plus access early farming spots to buy maps and benches. It’s designed for first-time players who want to maximize exploration before starting Act 2, but returning Hollow Knight veterans will also appreciate the streamlined routing.
Requirements & Prep
Before diving into Act 1, it’s important to understand the key resources and tools you’ll be managing.
Currencies:
- Rosaries — Main money used to buy maps and items. Dropped on death but recoverable from your death cocoon. Lost forever if you die twice before reclaiming.
- Shell Shards — Secondary resource for certain quests and later offensive tools.
Benches: Resting heals, saves, and sets your respawn point. Buy optional benches near bosses to avoid punishing runbacks.
NPCs:
- Shakra — Sells maps and compass tools.
- Seamstress — Quest NPC for Drifter’s Cloak.
- Nuu — Grants the Hunter’s Journal at Halfway Home.
Optional but Helpful:
- Magnetite Brooch (increases pickup radius, great for farming).
- Sting Shard offensive tool (sold by the Deep Docks vendor).

Route Overview
The Act 1 unlock path spirals outward from Bone Bottom. You’ll start at the Ruined Chapel, then fight your way to Bone Bottom for the first town bench. From there, move into The Marrow, where you’ll meet Shakra. Optional detours like Mosshome’s Rosaries farm help fund early purchases. From Shakra, head west to Moss Grotto for Silkspear, then use it to defeat the Bell Beast and unlock fast travel.
Next, drop into Deep Docks to earn Swift Step. Returning through the forge path unlocks the Lace boss, after which you’ll reach Far Fields. The Seamstress’s quest grants Drifter’s Cloak. Finally, push west through Greymoor and Shellwood, defeating Moorwing and Sister Splinter, before ending Act 1 mobility with the Widow boss to gain Needolin.
Think of it as a clockwise loop: Bone Bottom → Marrow/Shakra → Moss Grotto → Bell Beast → Deep Docks → Far Fields → Greymoor → Shellwood → Widow.

How to Unlock Silkspear (Moss Grotto Altar)
The Silkspear is the first major mobility item in Silksong, letting you cut through webbing to open blocked areas.
Steps to unlock:
- From Shakra’s location, climb upward into Moss Grotto.
- Traverse east through a trap-filled chamber.
- Loop back west to reach the weaver altar.
- Bind at the altar to unlock Silkspear.
Pro Tip: Immediately use Silkspear west of the altar to break webs and claim a Frayed Rosary String, a valuable early upgrade.
How to Unlock Fast Travel (Bell Beast)
Fast travel in Act 1 is tied to defeating the Bell Beast. You’ll also gain a Silk Heart that adds passive silk regeneration.
Steps:
- From the Silkspear altar, head east to a chamber with a bench and Shaman NPC (optional quest giver).
- Move west and free the Bell Beast with Silkspear.
- Defeat the boss using these tells:
- Medium-wide rumble → Beast charges. Sidestep and punish.
- Tall-wide rumble → Beast leaps. Stand underneath, strike on landing.
- Narrow rumble → Beast tosses bells. Avoid; unsafe to punish.
- After victory, bind to unlock the Bellways fast travel post.
Biggest mistake: healing mid-battle. Getting interrupted not only wastes time but drains your silk reserve.
How to Unlock Swift Step (Deep Docks)
The Swift Step lets Hornet sprint and air dash, vital for later zones.
Steps:
- Start from the Marrow prison bench.
- Descend into Deep Docks, avoiding spikes, falling rocks, and hot coal surfaces.
- Hit levers and explosive rocks to open new paths.
- (Optional) Buy the bench before a rush fight for safety.
- Defeat waves of enemies in the chamber beyond.
- Continue southwest to an altar and bind to unlock Swift Step.
Why it matters: Swift Step is required for platforming in Far Fields and is the first true mobility enhancer beyond Silkspear.
How to Unlock Drifter’s Cloak (Seamstress Quest)
The Drifter’s Cloak allows hovering in mid-air and riding wind shafts, opening vertical exploration.
Steps:
- Return through Deep Docks, passing Shakra.
- Optional: clear the forge wave room to unlock a free bench and vendor.
- Use Swift Step to unlock the Lace boss chamber; defeat Lace to progress.
- Push east into Far Fields. Unlock the Bellways fast travel post.
- Visit the Seamstress’s hut, accept the Flexile Spines quest.
- Farm Hokers nearby: strike once, dodge their spine volley, harvest cores. Three spawn per run; leave and re-enter to reset.
- Collect 25 cores, return, and complete the quest to receive the Drifter’s Cloak.
Pro Tip: The Cloak trivializes the Fourth Chorus boss — use wind shafts to reach and destroy its explosive cores instantly.

How to Unlock Cling Grip (Shellwood Altar)
The Cling Grip is Silksong’s wall jump ability.
Steps:
- Travel west through Greymoor, resting at benches and speaking to Nuu at Halfway Home to unlock the Hunter’s Journal.
- Defeat the Moorwing boss (phase two adds dangerous blade patterns; retreat and reset if overwhelmed).
- Progress into Shellwood, activate the purchasable bench, and defeat Sister Splinter. Focus on quickly destroying splinters and ranged tools for adds.
- Move west through vines and pogo sections until you reach an altar.
- Bind to unlock Cling Grip.
Why it matters: Wall jump unlocks hidden vertical paths and is required to progress toward Needolin.
How to Unlock Needolin (Widow Boss)
The Needolin is the final mobility item in Act 1, obtained after defeating the Widow.
Steps:
- From the Sister Splinter bench, climb northeast, wall-jump through bell piles, and smash the barriers.
- Move down-east, then west into a hidden wall shortcut. Break vines to open a safe return path.
- Return east and descend to the Widow boss chamber.
- In phase one, Widow mixes standard and double-damage strikes. In phase two, watch for bell drop patterns followed by blade flurries.
- Defeat Widow and bind to gain Needolin.
- A short dreamlike platforming sequence leads back to a bench and frees the town of Bellhart.
Farming Loops for Rosaries
Two reliable Rosaries farms exist in Act 1:
- Mosshome Bench Loop:
- From the bench: defeat 2 enemies (10 Rosaries), drop to 3 below (15 Rosaries).
- Return to the bench to reset.
- ~25 Rosaries per 30 seconds.
- Far Fields Skarr Loop:
- From the Bellways bench: defeat the Skarr Scout (13 Rosaries) and the Skarr Scout + Stalker pair (~40 Rosaries).
- Save and quit to reset quickly.
- ~50 Rosaries per run.
Best use: fund Shakra’s maps and optional benches.

Common Mistakes to Avoid
- Healing mid-battle: Wait for clear windows; getting hit cancels the heal and drains silk.
- Skipping shortcut levers: Always open side gates — they save long death runs.
- Not buying benches before bosses: A small Rosary cost prevents major frustration.
- Ignoring Widow’s second-phase blades: Retreat during blade storms; don’t try to punish.
- Dying with unspent Rosaries: Always spend before major fights.
Frequently Asked Questions
Do I need to buy every bench?
No. Only buy those near bosses or long routes.
Can I skip farming?
Yes, but farming makes buying maps and benches less stressful.
Are maps essential?
Not mandatory, but they save huge amounts of time navigating Pharloom.
What if I can’t beat Moorwing or Widow?
Use benches and shortcuts to minimize punishment. Learn their phase-two tells and don’t overcommit to punishes.
Summary Quick Card
- Rest at Ruined Chapel bench, beat Moss Mother
- Enter Bone Bottom, set bench
- Through The Marrow, open shortcuts, meet Shakra
- Optional: Mosshome Rosaries farm
- Unlock Silkspear in Moss Grotto
- Free & defeat Bell Beast → unlock fast travel
- From Marrow prison, descend into Deep Docks → clear waves → gain Swift Step
- Return via forge, defeat Lace, reach Far Fields
- At Seamstress hut: farm Hokers, turn in → unlock Drifter’s Cloak
- Travel west through Greymoor & Shellwood → defeat Moorwing and Sister Splinter → bind for Cling Grip
- Open shortcuts east, defeat Widow → unlock Needolin