Arknights: Endfield 30-Second Quick-Start Guide (TL;DR)
- Spend all your sanity daily on skill materials and operator promotion—don’t let it cap.
- Complete dailies, map objectives, main story, and claim manual rewards to hit level 15 by end of day one.
- Unlock and immediately upgrade to electric mining rigs once available; replace portable rigs.
- Set up relay towers and electric pylons to automate resource gathering and gear crafting while AFK.
- Don’t pull on limited banners without 120 pulls saved—pulling lightly gets heavily punished.
- Focus on two things for team building: operator class and weapon. DPS or support? Physical or elemental? That’s your foundation.
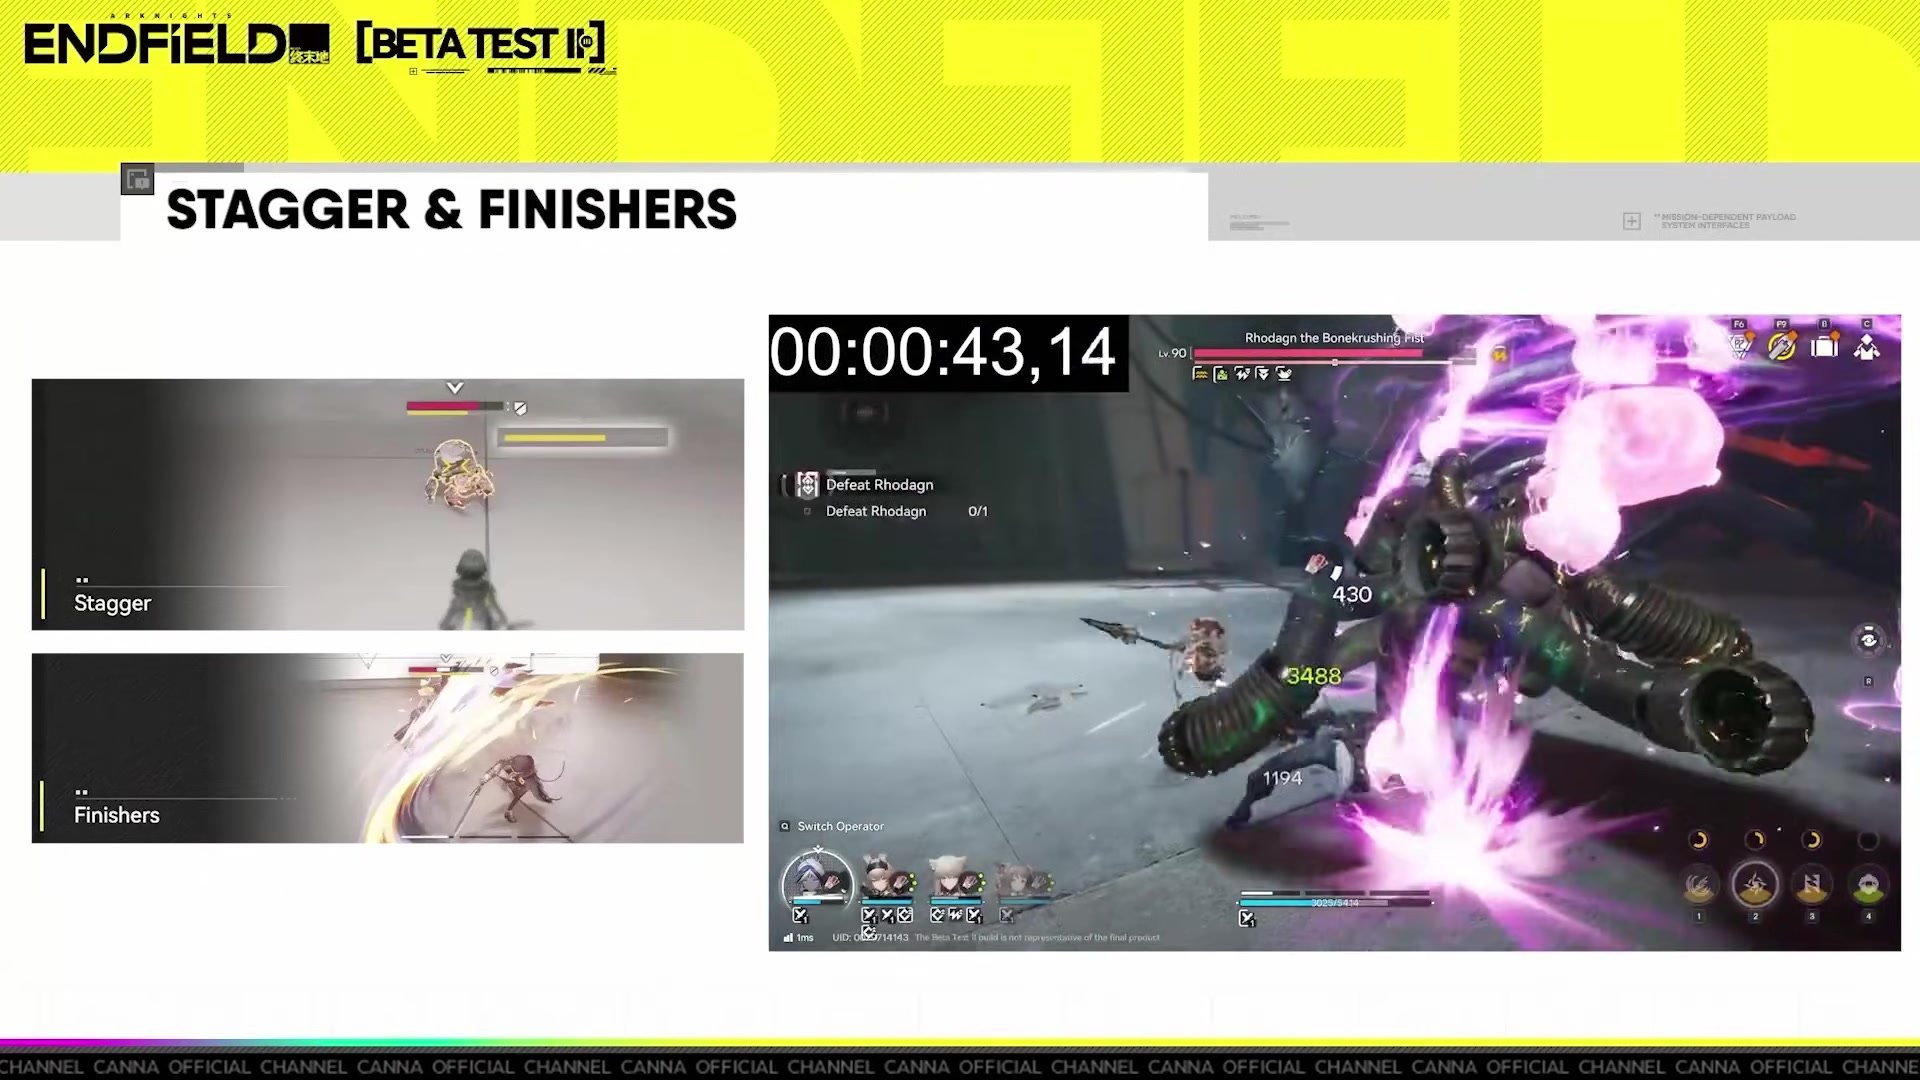
- Learn stagger mechanics early—filling the enemy stagger meter triggers finisher attacks that restore skill points and deal massive damage.
- Biggest mistake to avoid: Building pity without committing to a 120-pull guarantee. You’ll lose the 50/50 and waste pulls.
What This Guide Helps You Do
This guide helps you build a strong account foundation on day one and understand Arknights: Endfield’s core systems—operator building, damage types, gacha mechanics, and factory automation—so you don’t repeat the creator’s closed-beta mistakes. You’ll know exactly what to prioritize, what to skip, and how to set up passive income that compounds your progression every day after.
Best for: Brand-new players launching Endfield, players returning from Arknights Classic who need to relearn systems, and anyone who wants to avoid early-game pitfalls that cost weeks of wasted resources.

Requirements & Prep
- Account: Fresh Arknights: Endfield account (game is now live).
- Story access: Main story quests unlock as you level; early quests have reduced level requirements compared to closed beta.
- Sanity: Your primary resource. You regenerate sanity over time and should spend all of it daily on materials and promotions.
- Starting materials: You’ll receive manual rewards from early quests—claim all of these.
Route Overview
Your first day in Endfield follows a simple flow: complete story and dailies → spend sanity on materials → unlock factory upgrades → automate production. You’ll progress through the main story naturally, which unlocks new areas and factory buildings. As you level (targeting level 15 by end of day), you’ll unlock electric mining rigs—this is your critical inflection point. Once they’re available, immediately replace your portable mining rigs and set up relay towers and electric pylons to connect everything into a centralized base. This creates a fully automated resource-gathering loop that runs while you’re offline, forming the foundation of your entire account’s gear-crafting and progression pipeline.
Step-by-Step Walkthrough
Step 1: Spend All Your Sanity on Materials
Why it matters: Sanity is your limiting resource. Unlike other gacha games, Endfield heavily gates progression behind skill materials and operator promotion materials. If you let sanity cap, you waste regeneration and fall behind immediately.
What to do: Use sanity on whatever your operators need most: skill materials to level combat skills, promotion materials to unlock new talent breakpoints at levels 20, 40, 60, and 80. Early on, you won’t have a long list of priorities, so spread pulls across multiple operators to build a flexible roster.
Common mistake: Hoarding sanity “just in case.” There’s no “just in case”—spend it daily, or you’ll hemorrhage efficiency.
Step 2: Complete Daily Quests and Map Objectives
Why it matters: Dailies and map objectives reward experience, materials, and unlock story progression. Completing them is non-negotiable for hitting your day-one level target.
What to do: Log in, check the daily quest board, and complete all available daily tasks. Then clear any map objectives listed in your current story chapter. These are often puzzle-based or combat encounters that reward one-time materials.
Common mistake: Ignoring map objectives because they seem optional. They’re not—they’re free materials and story progression gates.
Step 3: Progress Main Story Quests
Why it matters: The main story unlocks new factory buildings, operators, and systems. It’s your primary XP source and gates access to higher-tier materials.
What to do: Push main story as far as your level allows. The game has reduced level requirements on story quests compared to closed beta, so you should progress smoothly. Defeat elite enemies when they appear—they drop better materials.
Common mistake: Skipping story dialogue or rushing through without reading operator abilities. You’ll miss context on how damage types and skills interact.
Step 4: Claim All Manual Rewards
Why it matters: Manual rewards are free materials and resources given by the game for early progression milestones. They’re part of your day-one resource budget.
What to do: Check your rewards tab frequently and claim everything. These stack up quickly and provide a significant early boost.
Step 5: Unlock and Upgrade to Electric Mining Rigs
Why it matters: This is the single most impactful action you can take on day one. Electric mining rigs replace portable rigs and generate resources automatically, even while you’re offline. It’s the difference between passive and active progression.
What to do: As soon as electric mining rigs unlock in your factory (likely after level 10–15), build them immediately. Dismantle all portable mining rigs and replace them with electric versions. Electric rigs require power (electricity) to function, so you’ll also need to unlock electric pylons.
Common mistake: Delaying this upgrade. Every hour you spend with portable rigs is an hour of lost passive income. Prioritize it above almost everything else.
Step 6: Set Up Relay Towers and Electric Pylons
Why it matters: Relay towers and electric pylons create an interconnected base that powers your mining rigs and other structures. Without this network, you’ll be restricted in where you can build and how much you can gather.
What to do: Build relay towers to extend your base’s reach, then place electric pylons to distribute power. Connect your mining rigs to the pylon network. It’s not mandatory to connect everything immediately, but doing so removes build restrictions and lets you expand freely.
Common mistake: Treating factory automation as “nice to have.” It’s foundational. A fully automated base means you gain resources 24/7 without logging in.
Step 7: Reach Level 15 by Day’s End
Why it matters: Level 15 is the creator’s benchmark for a strong day-one foundation. It ensures you’ve completed enough story, dailies, and objectives to unlock key systems and build momentum.
What to do: Follow steps 1–6 in order. If you complete all dailies, map objectives, and push main story as far as possible while spending sanity, you’ll naturally hit level 15 without grinding.
Common mistake: Grinding low-level maps for XP instead of progressing story. Story gives better XP and unlocks more systems.

Operator Building: Class, Weapon, and Damage Types
The Two-Factor Team-Building Rule
When building a team, focus on only two things: class and weapon. Everything else is secondary.
Class: There are six classes in Endfield, but think of them as either DPS (deal damage) or support (buff, debuff, or enable combos). Supports are straightforward; DPS characters have complex damage mechanics that vary by damage type.
Weapon: Your operator’s weapon determines how they deal damage and what skills they can use. A character with a physical weapon plays entirely differently from the same character with a heat-element weapon.
The Five Damage Types: Physical vs. Arts
Physical damage works uniquely: it revolves around vulnerable stacks. Certain skills apply vulnerable to enemies, while others consume vulnerable for increased damage or bonus effects. Physical status effects won’t activate unless vulnerable is already on the target. This is the key rule to remember.
Arts damage (heat, electric, cryo, nature) uses the art system. Each attack applies arts inflictions—elemental stacks on enemies. When two inflictions interact, one of two things happens:
- Art burst: Same element applied twice → elemental explosion.
- Art reaction: Different elements interact → unique effect based on order.
Critical detail: The order of applying elements matters. Applying nature then heat isn’t the same as heat then nature. This means Endfield is designed around multi-element teams, not mono-element rosters. You’ll want operators of different elements on the same squad to trigger reactions deliberately.
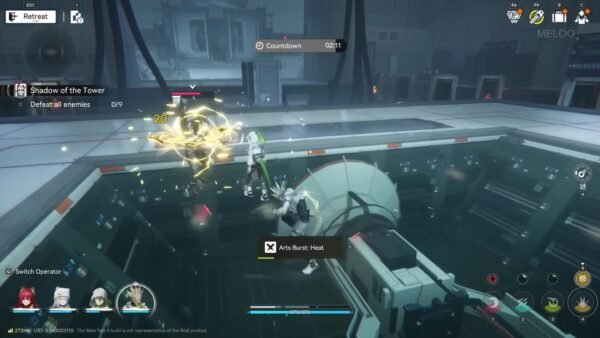
Stagger: The Most Important Mechanic
Every enemy has a stagger meter. When it fills, the enemy becomes dazed or stunned and takes increased damage. If your operator is nearby when stagger triggers, your next basic attack becomes a finisher—a heavy-damage attack that restores skill points (SP).
Why this matters: Finishers are your primary way to restore SP and burst damage in harder content. Learning to time and plan staggers is one of the highest-impact skills you can develop. Certain weapons and gear increase stagger effectiveness, so you’ll want to build around stagger as you progress.
Operator Attributes and Leveling
Operators scale off four attributes: strength, agility, intellect, and will. Each operator has a main attribute and a secondary attribute—both increase attack power. Your operator’s level cap is 90 (reduced from 99 in closed beta).
Promotion breakpoints: Levels 20, 40, 60, and 80 unlock new passive talents and increase skill caps. These are major power spikes, so prioritize reaching them.
Combat skills: Each operator has four combat skills that level to rank 9, then unlock mastery levels. Mastery upgrades require marks of perseverance, a limited event material. Be selective early—you won’t have enough marks to upgrade every skill. The creator has mentioned the devs plan to distribute more marks over time, but expect scarcity at launch.
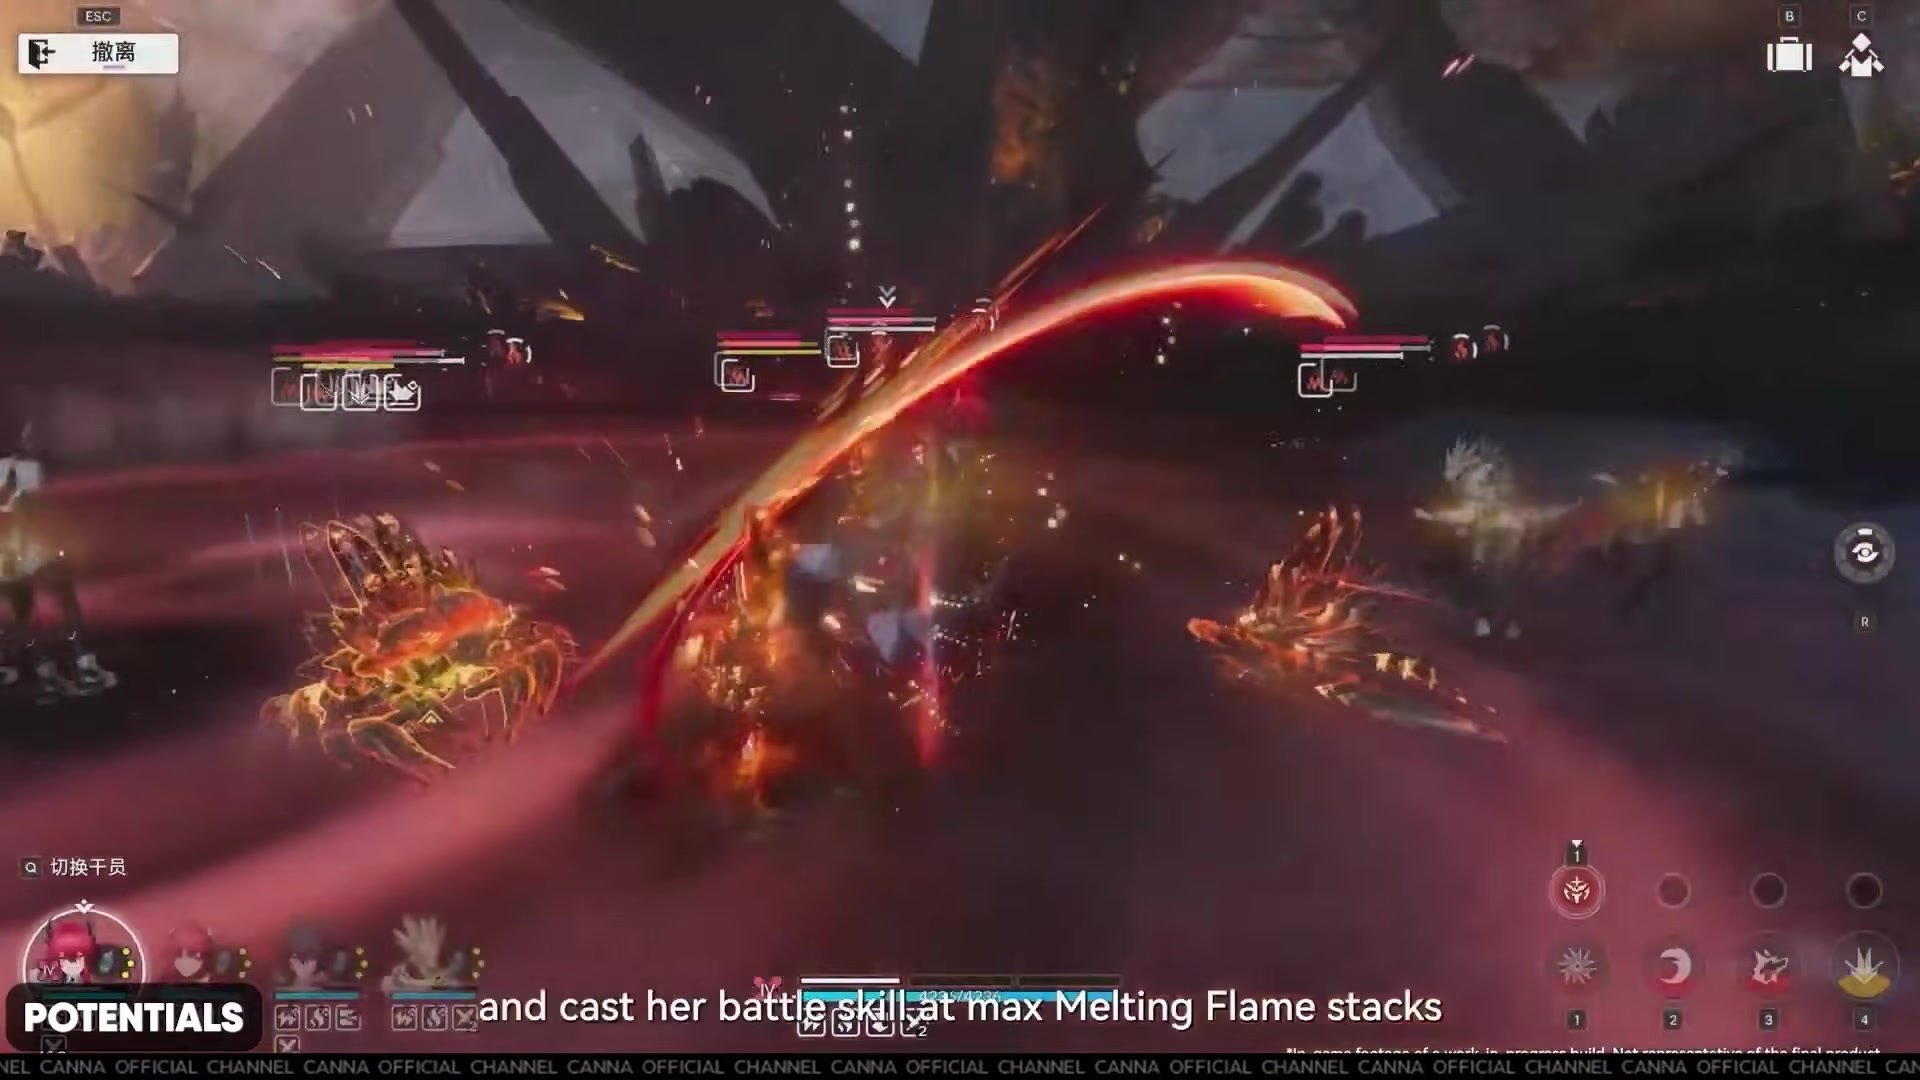
Potentials: The Dupe System
Potentials unlock through duplicate operators and provide moderate (not massive) power increases. Endfield’s dupe system is intentionally restrictive—duplicates aren’t required to make an operator viable. If you enjoy a character and plan to use them long-term, potentials are worth investing in for increased strength, but they’re completely optional and not something to rush.

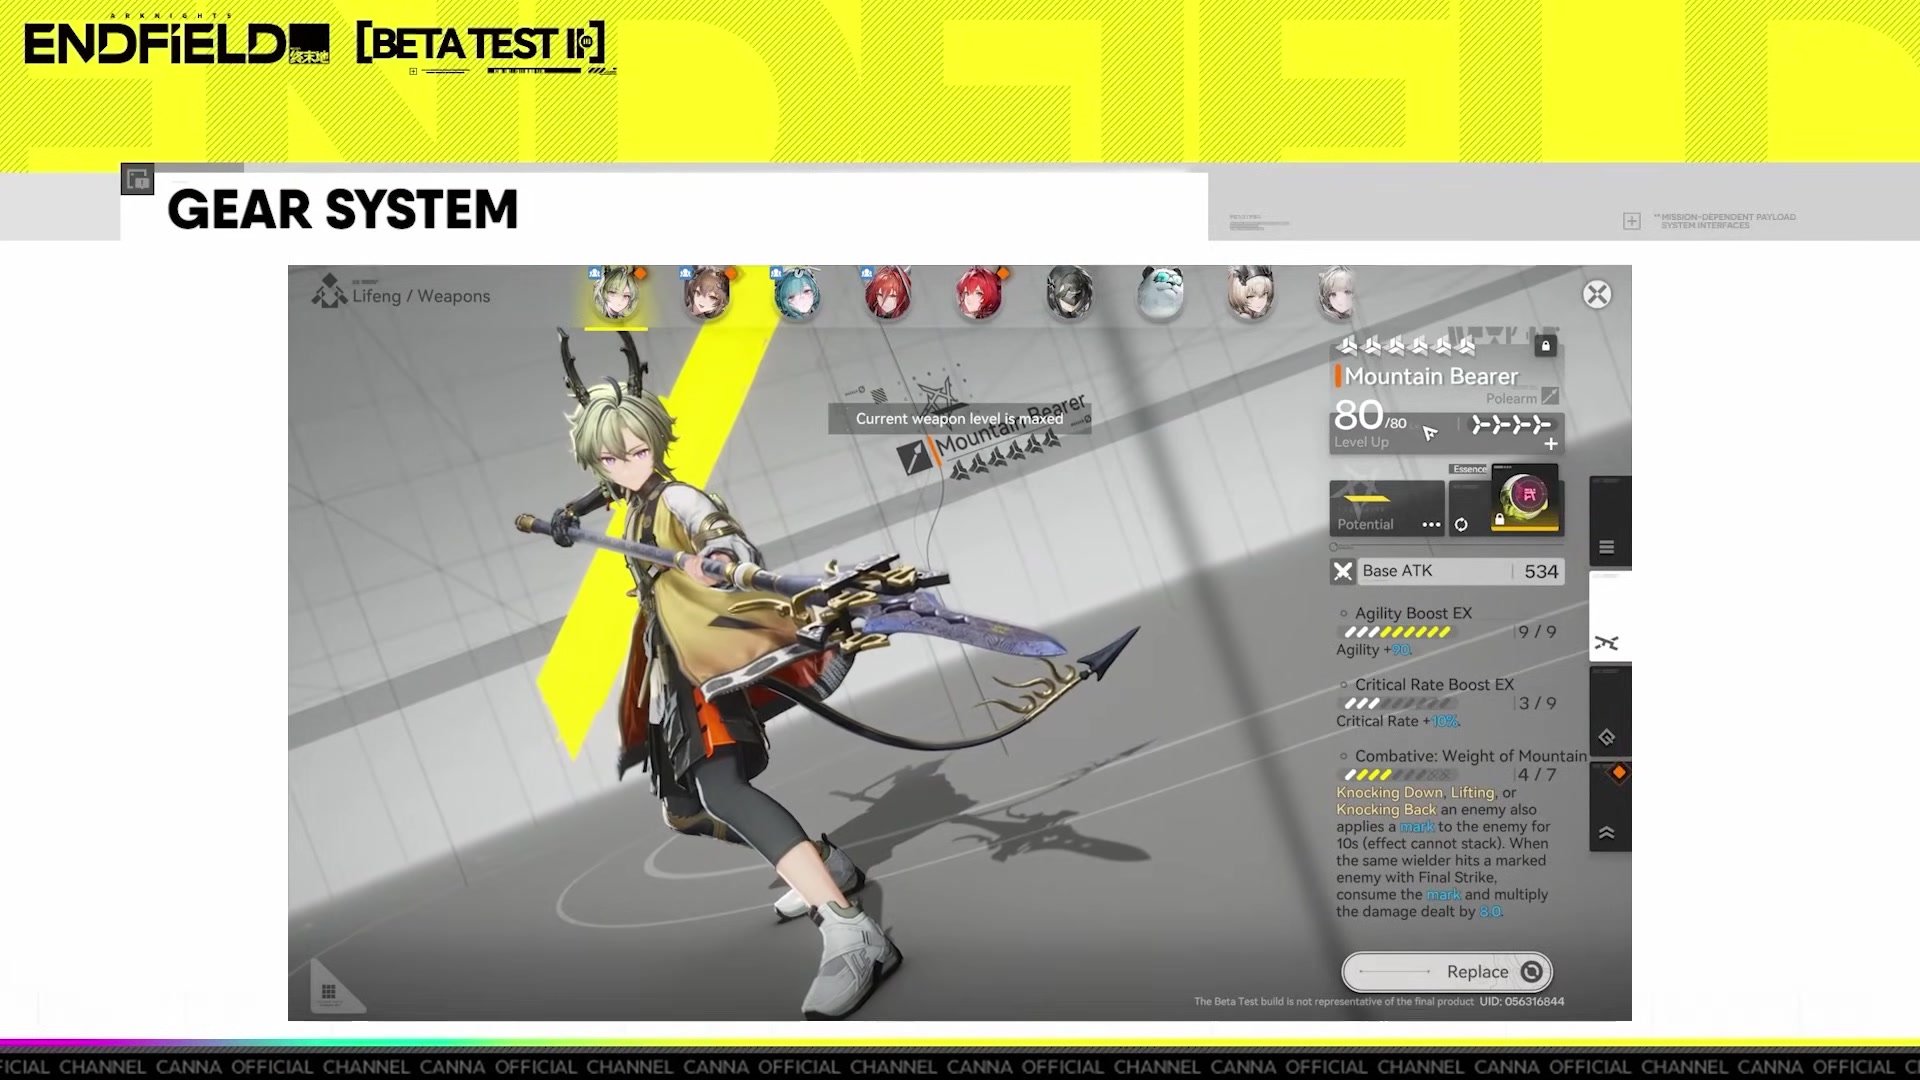
Gear and Weapons
Gear: No RNG, Pure Customization
You have four gear slots per operator. There’s no RNG subset rolling—you choose which version of a gear piece to craft with the attribute and set bonus you want.
How it works:
- Equip three matching pieces to activate a set bonus.
- Use the fourth slot for a non-set piece to customize your build (e.g., add a specific stat).
- Non-set gear exists and is great for creative builds.
Crafting gear requires resources from your factory, which is why automating your base is so critical. You’ll be crafting gear constantly as you progress, and a passive resource loop means you can craft while offline.
Weapons: Traits and Tuning
Weapons come with three traits that can be upgraded through tuning, duplicates, and essence. Essence becomes much more relevant later in the game. Early on, focus on upgrading and promoting weapons; don’t heavily optimize one weapon’s traits yet.

Gacha System: Banners, Pity, and How Not to Waste Pulls
Endfield’s gacha system has caused confusion. Here’s the breakdown, simplified.
The Three Banners
New Horizon (Beginner) Banner:
- Capped at 40 pulls.
- Guarantees a random six-star operator on the 40th pull.
- You’ll earn enough pulls from early story to complete it quickly.
- After finishing all 40 pulls, you receive a New Horizon weapon crate that lets you select a free six-star weapon.
- Worth pulling even if you get lucky early—the weapon crate is a guaranteed reward.
Standard Banner:
- Guarantees a random six-star operator every 80 pulls.
- After 300 total pulls, you unlock a selectable six-star operator.
- No rate-ups; mainly for collecting standard characters to fill gaps.
- Less priority than featured banners.
Featured (Chartered) Banner:
- This is where most players spend pulls.
- Hard pity at 80 pulls: Guarantees a six-star operator.
- Soft pity at 65+ pulls: Six-star rate increases by 5% per pull.
- 50/50 system: When you hit a six-star, there’s a 50% chance it’s the featured character. If you lose the 50/50, you get a standard character (35% chance) or a previously featured operator (15% split between two).
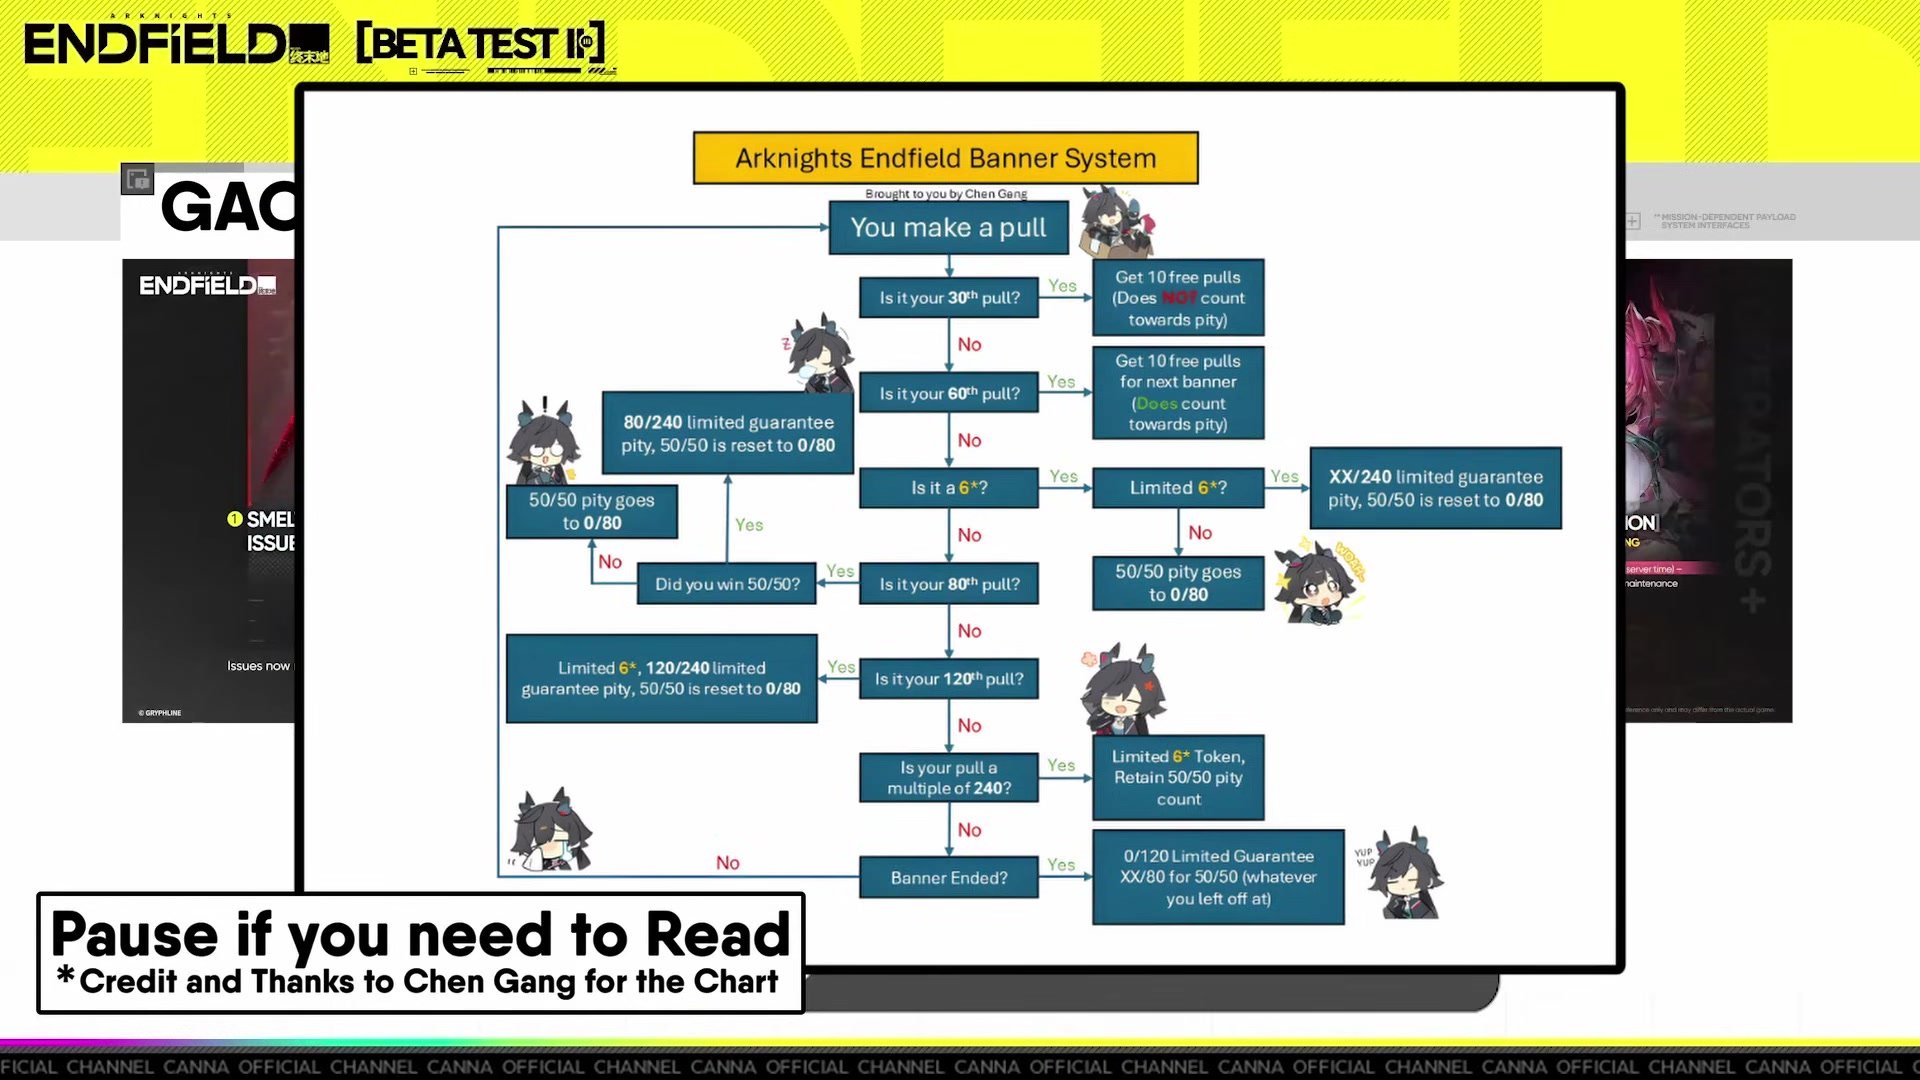
- 120-pull hard guarantee: If you lose the 50/50, the banner tracks a separate counter toward a guaranteed featured character at 120 pulls. This counter doesn’t carry over between banners—every new banner starts fresh.
Pity Carryover Rules (Critical)
What carries over: Your pull count toward the soft pity (65–80) carries over between featured banners. If you pull 70 times on banner A and don’t get a six-star, you start banner B at pull count 70.
What doesn’t carry over: The 120-pull hard guarantee (the “loss protection”). Losing a 50/50 on banner A doesn’t protect you on banner B. Every new banner is a fresh 50/50 with no carryover protection.
Bonus pulls: After 30 pulls on a featured banner, you gain 10 urgent recruitment pulls. These don’t count toward pity, don’t advance the 120-pull guarantee, and don’t affect future guarantees. Treat them as free extra pulls.
Head-Hunt dossier: After 60 pulls on a featured banner, you get a dossier that converts to a free 10-pull on the next featured banner. This bonus only happens once per banner.
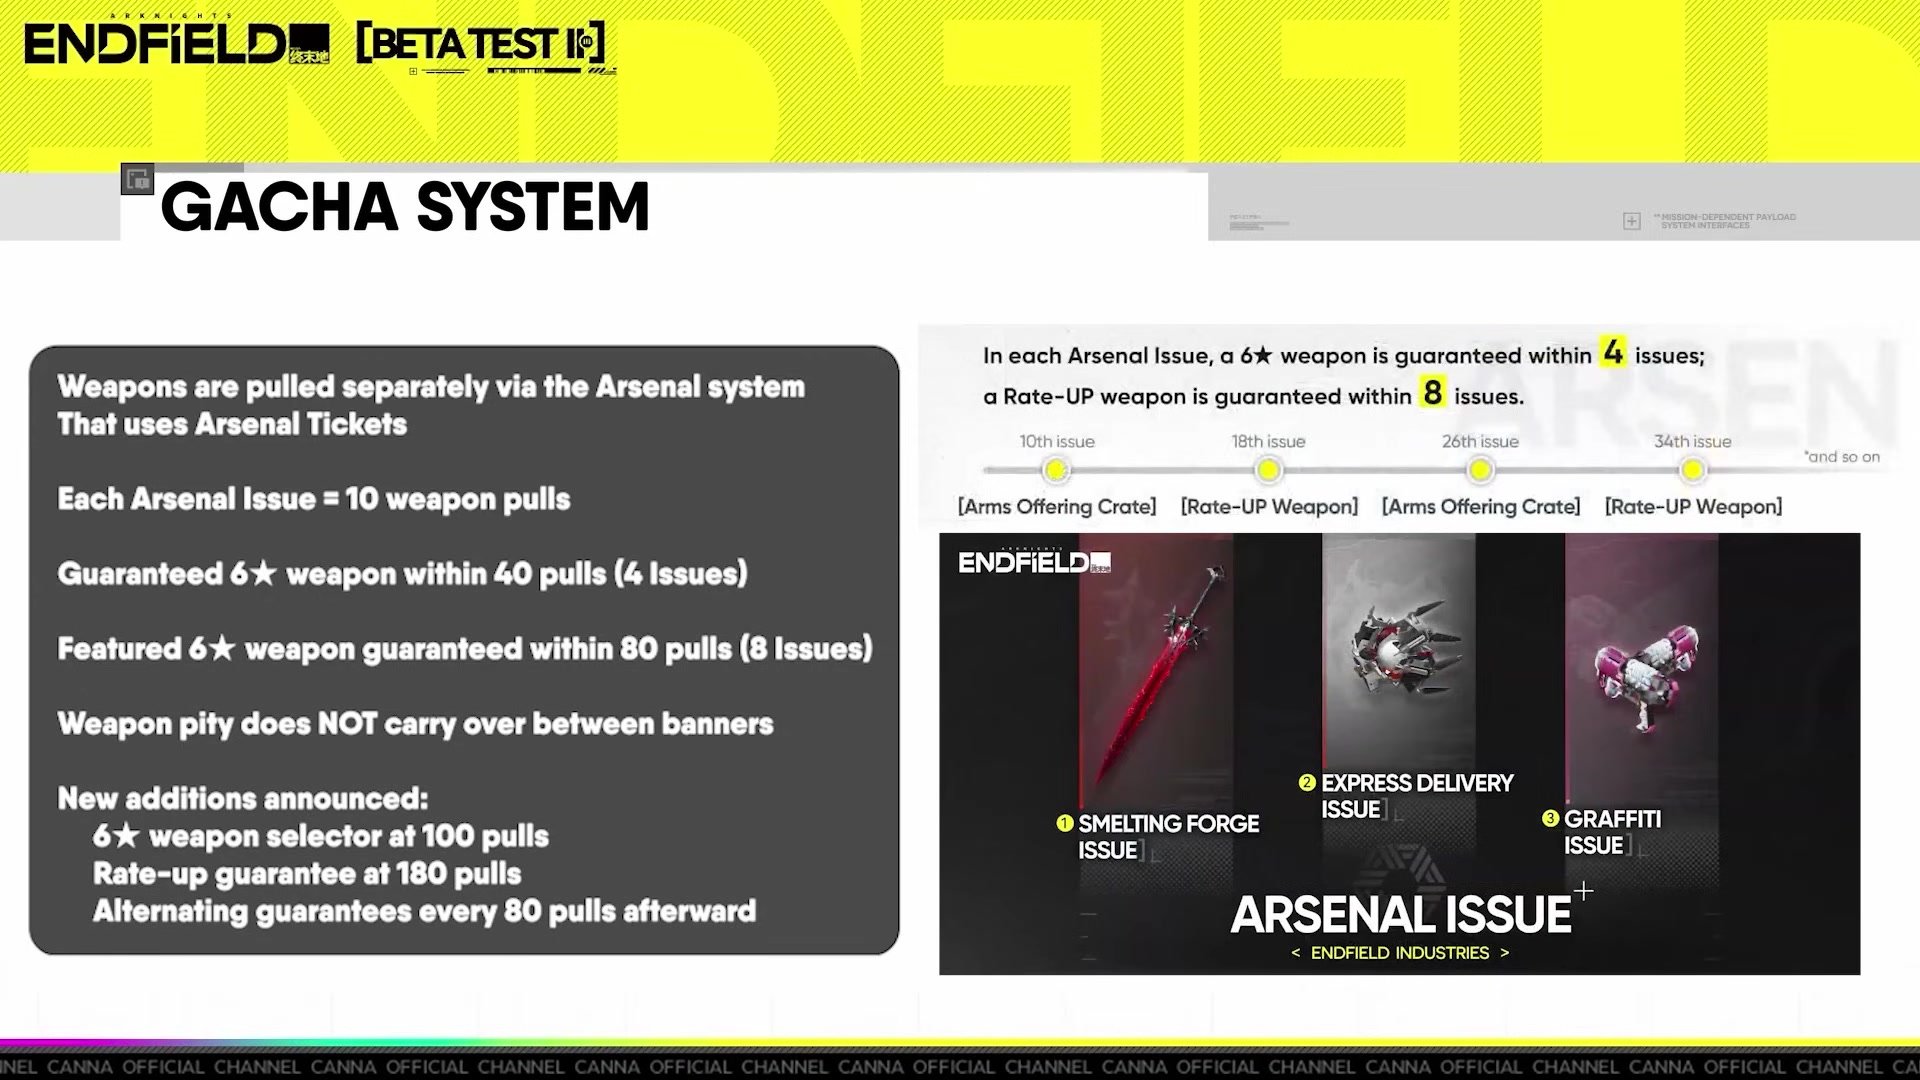
Weapon Arsenal (Separate System)
Weapons use a separate gacha system called the arsenal, fueled by arsenal tickets earned from character pulls, events, weekly routines, the credit store, the protocol pass, and converting barrel or geometries.
Arsenal pulls:
- Each arsenal issue = 10 weapon pulls.
- Six-star weapon guaranteed within 4 issues (40 pulls).
- Featured six-star weapon guaranteed within 8 issues (80 pulls).
- Weapon pity doesn’t carry over between banners.
- New guarantees announced: Six-star selector at 100 pulls, rate-up guarantee at 180 pulls, alternating guarantee every 80 pulls afterward.
The Golden Rule: Don’t Pull Without 120 Pulls Ready
This is the biggest mistake in Endfield’s gacha: Pulling on limited banners without 120 pulls saved. If you build pity without committing to a full guarantee, you’ll lose the 50/50 and waste pulls chasing a character you can’t guarantee.
Safe pulling strategy: Save 120 pulls before pulling on any featured banner you care about. This ensures you can either get the featured character on the 50/50 or hard-guarantee them at 120 if you lose. Anything less is gambling.
Arknights: Endfield Common Mistakes
- Mistake: Letting sanity cap. → Fix: Spend all sanity daily on materials. Set a phone reminder if needed.
- Mistake: Ignoring factory automation. → Fix: Upgrade to electric mining rigs and set up relay towers as soon as they unlock. This is your passive income engine.
- Mistake: Building pity without a 120-pull guarantee. → Fix: Save 120 pulls before pulling on any limited banner. Don’t gamble on 50/50s.
- Mistake: Spreading mastery upgrades too thin. → Fix: Marks of perseverance are scarce. Pick 2–3 operators and focus mastery on their core skills only.
- Mistake: Pulling on standard banner early. → Fix: Standard banner has no rate-ups and is a trap for new players. Ignore it until you’ve secured your core roster on featured banners.
- Mistake: Treating potentials (dupes) as mandatory. → Fix: They’re optional. If you enjoy a character, potentials are nice but not required for viability.
- Mistake: Delaying main story for grinding. → Fix: Push main story as far as possible. It unlocks new systems, better XP, and better materials.
- Mistake: Not learning stagger mechanics. → Fix: Stagger is the highest-impact mechanic in Endfield. Finishers restore SP and burst damage. Learn to time them early.
Arknights: Endfield Advanced Tips & Time Savers
Multi-Element Team Building
Endfield is designed around multi-element teams, not mono-element rosters. Deliberately pair operators of different elements to trigger art reactions and bursts. This compounds your damage far more than stacking the same element.
Stagger Planning in Harder Content
As you progress to harder content, time and damage efficiency become critical. Plan staggers in advance—know which skills will fill the meter and which operators will finish. Gear and weapons that increase stagger effectiveness become valuable investments.
Factory Optimization
Once your base is automated, you can expand production chains. The creator mentions accidentally blowing up their factory multiple times in closed beta—this suggests you can over-produce and create bottlenecks. Plan your production lines to avoid waste.
FAQ
Q: Can I make a character viable without pulling duplicates?
A: Yes. Potentials (dupes) provide moderate increases but aren’t required. The dupe system is intentionally restrictive, and every operator is designed to be viable without them.
Q: Should I pull on the standard banner?
A: No, not early. Standard banner has no rate-ups and is a trap for new players. Focus on featured banners where you can guarantee the character you want.
Q: What if I lose the 50/50 on a featured banner?
A: You’ll get a standard character or a previously featured operator. Your next six-star is guaranteed to be the featured character at 120 pulls on that banner. However, this guarantee doesn’t carry to the next banner—you’ll face a fresh 50/50 when a new featured banner launches.
Q: Is it mandatory to set up factory automation on day one?
A: No, but it’s the single most impactful action you can take. A fully automated base generates resources 24/7, which compounds your progression massively. The creator strongly recommends it.
Q: What are marks of perseverance, and why are they important?
A: They’re the material needed to upgrade operator skills to mastery level. They’re limited event materials, so you’ll run out quickly. Be selective about which operators and skills you invest in early.
Q: How do I deal physical damage efficiently?
A: Physical damage relies on vulnerable stacks. Certain skills apply vulnerable, while others consume it for increased damage or bonus effects. Always ensure vulnerable is on the target before consuming it—status effects won’t activate otherwise.
Quick Reference Card (Screenshot This)
- Day One Priority: Spend sanity → Complete dailies → Progress story → Claim rewards → Reach level 15.
- Factory Setup: Unlock electric mining rigs → Replace portable rigs → Build relay towers and pylons → Automate everything.
- Team Building: Focus on class (DPS/support) and weapon type. Multi-element teams trigger art reactions—don’t run mono-element.
- Damage Types: Physical = vulnerable stacks. Arts (heat, electric, cryo, nature) = elemental inflictions and reactions. Order matters.
- Stagger Mechanic: Fill enemy stagger meter → Enemy stunned → Your finisher attack restores SP and deals massive damage. Learn this early.
- Operator Leveling: Level cap is 90. Promotion breakpoints at 20, 40, 60, 80 unlock talents. Be selective with mastery upgrades (marks of perseverance are scarce).
- Gear: No RNG. Choose your attributes and set bonuses. Three matching pieces = set bonus; fourth slot for customization.
- Gacha Rule: Don’t pull on featured banners without 120 pulls saved. Pulling light gets heavily punished. You will lose the 50/50.
- Beginner Banner: Capped at 40 pulls. Guarantees random six-star + free six-star weapon selector. Worth completing.
- Pity Carryover: Soft pity (65–80) carries between banners. Hard guarantee (120) does not—every new banner is a fresh 50/50.
- Urgent Recruitment Pulls: Free bonus pulls at 30+ pulls on featured banner. Don’t count toward pity or guarantees.
- Potentials (Dupes): Optional. Provide moderate increases but not required for viability.