
30-Second Quick-Start (TL;DR)#
- White stats (base stats) cap at 9,999 and can’t be increased once maxed—feeding stops working.
- Blue stats (growth stats) are what you actually farm and transfer between Digimon.
- Start with a baby-stage Digimon (lowest base stats = highest growth potential).
- Level it to 99 to unlock maximum feeding capacity.
- Farm strong Digimon with 4,000–5,000 blue stats, then feed them to mid-tier Digimon to create 7,000+ stat feeders.
- Combine five high-stat feeders (9,999 each) into a single baby Digimon to reach perfect 9,999 blue stats.
- The system requires heavy farming and repetition—this is the only way to create truly optimized Digimon.
What This Guide Helps You Do#
This guide teaches you how to understand and maximize the stat system in Digimon Time Stranger, specifically how to build a Digimon with perfect 9,999 blue stats while avoiding the common misconception that simply feeding random Digimon works. You’ll learn the difference between white (base) and blue (growth) stats, why baby-stage Digimon are essential, and the exact farming-and-feeding chain required to create a truly optimized Digimon.
It’s best for players who want to push into late-game content or create the strongest possible team, and for anyone confused by conflicting advice online about how stats actually transfer. If you’re happy with a Digimon that has maxed white stats, you can skip the advanced blue-stat farming—but if you want to understand why that’s not optimal, read on.

Requirements & Prep#
To follow this guide effectively, you need:
- Access to a farming method that generates XP efficiently (the creator references an AFK XP farming video on their channel as a resource).
- Multiple Digimon to feed and breed—this isn’t a solo-Digimon process.
- Time and patience; the stat-building chain is intentionally grindy and repetitive.
- At least one Digimon capable of reaching level 99 (to serve as your primary feeder recipient).
- Understanding that you’ll “lose a lot of time” in the process—this isn’t a shortcut method.
Optional but Helpful: If you plan to build multiple perfect Digimon, bookmark or reference the AFK farming guide mentioned in the video to automate XP generation while you handle the feeding chain manually. This removes the most tedious part of the grind.
Route Overview#
The stat-building process in Digimon Time Stranger is a multi-stage farming chain, not a single route. Here’s how it flows:
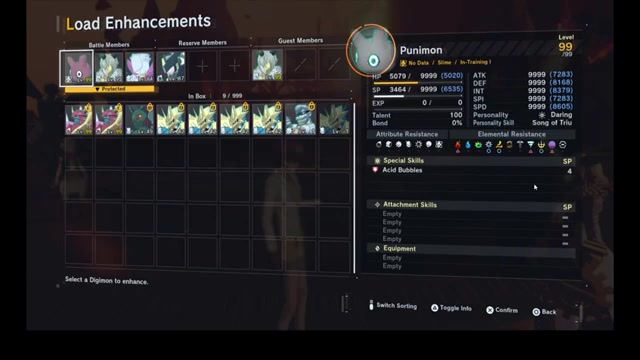
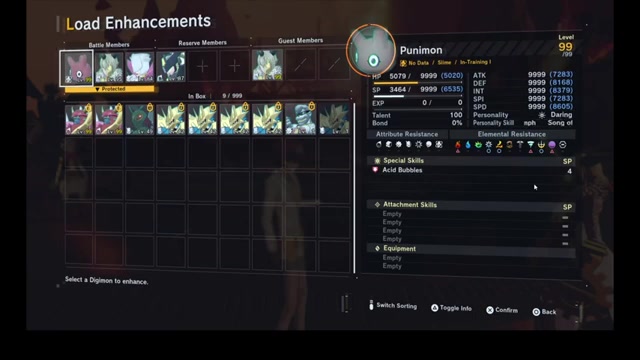
First, you’ll notice that white stats (the numbers shown in white text) represent a Digimon’s base, permanent stats and cap at 9,999 per stat. Once capped, feeding that Digimon to others stops transferring stats—a critical realization many players miss. Blue stats, by contrast, are growth stats that transfer at a percentage when you feed one Digimon to another.
The actual process begins with selecting a baby-stage Digimon as your target. Baby Digimon have the lowest base stats, which paradoxically means they’ve got the most room to grow blue stats—they’re blank slates. You level this baby to 99, which unlocks its maximum feeding capacity.
In parallel, you farm or create intermediate Digimon with blue stats in the 4,000–5,000 range. These are fed to other Digimon to create a second tier of feeders with 7,000+ blue stats. Finally, you need five of these high-tier feeders (ideally 9,999 each) to feed into your baby-stage target, which absorbs a percentage of their blue stats and approaches the 9,999 cap.
The entire chain is a pyramid: many weak Digimon → fewer mid-tier Digimon → five strong feeders → one perfect Digimon.
Step-by-Step Walkthrough#
Understanding the Two Stat Types#
Before you start farming, you need to understand what you’re actually looking at. Each Digimon has two stat displays: white numbers (base stats) and blue numbers (growth stats). The white stats are permanent and can’t be increased once they reach 9,999. If you try to feed a Digimon with maxed white stats to another Digimon, nothing happens—the feeding fails silently in terms of stat transfer.
Blue stats are the real currency of the system. These are what transfer when you feed one Digimon to another, and they transfer at a percentage (the exact percentage varies, but the creator notes it could be 30%, 10%, or other values—the system isn’t transparent). To maximize blue stat transfer, you need the source Digimon to have maximum blue stats available.
Selecting Your Target Digimon#
Choose a baby-stage Digimon to be your final, optimized unit. Baby Digimon start with the lowest base stats in the game. This isn’t a weakness—it’s the entire point. Because they’ve got lower white stats, they’ve got more room for blue stats to grow. A baby Digimon at level 1 with 100 blue HP, for example, has vastly more growth potential than an adult or mega Digimon with the same blue HP value.
You don’t need to have done any enchantments or special preparation on this baby. It can be completely fresh. The only requirement is that you’re willing to level it to 99, which unlocks full feeding capacity.
Leveling Your Target to 99#
Get your chosen baby Digimon to level 99. The creator mentions you can do this through normal leveling, by pushing the Digimon through its evolution line to mega form and back, or by using items that increase talent/level. The method doesn’t matter—only the result does. At level 99, your baby can accept the maximum amount of feeding.
This is where the AFK XP farming video becomes valuable; grinding a single Digimon to 99 manually is tedious, so automating it frees you to prepare your feeder chain.
Creating Your First Tier of Feeders (4,000–5,000 Blue Stats)#
Now you need to farm or create Digimon with blue stats in the 4,000–5,000 range. These are your foundational feeders. The creator doesn’t specify the exact method for generating these, but the implication is that you level Digimon naturally, farm them, or breed them until they accumulate blue stats in this range.
The key insight is that you can’t jump straight to 9,999. You build up in tiers, and a Digimon with 4,000–5,000 blue stats is a stepping stone, not a final product.
Creating Your Second Tier of Feeders (7,000+ Blue Stats)#
Once you’ve got multiple Digimon with 4,000–5,000 blue stats, feed them into a fresh, empty Digimon (one with no stats yet). The creator demonstrates this by feeding two or three of these mid-tier Digimon into a single target, which brings the target’s stats above 7,000.
This is the critical step many guides skip or misunderstand. You can’t feed a single 4,000-stat Digimon into your baby and expect it to reach 9,999. You must first consolidate multiple feeders into intermediate Digimon to build up to 7,000+, then those 7,000+ Digimon become your real feeders.
Creating Your Final Feeders (9,999 Blue Stats)#
To reach 9,999 blue stats on a single Digimon, you’ll need approximately five of your 7,000+ stat Digimon fed into one target. The creator states: “To increase to 9,999 blue stats, you need to do this like a lot of times,” referring to the feeding process. Five high-tier feeders into one empty Digimon will give you a 9,999-stat Digimon.
You’ll need to repeat this process five times to create five separate 9,999-stat Digimon, because your final step requires five of these to feed into your baby-stage target.
The Final Feed: Creating Your Perfect Digimon#
Once you’ve got five Digimon with 9,999 blue stats, feed all five of them into your level-99 baby Digimon. The baby will absorb a percentage of each feeder’s blue stats. With five maximum-stat feeders, your baby should reach or come very close to 9,999 blue stats across all stats.
This is your finished product: a baby-stage Digimon with maxed white stats and maxed blue stats, representing the absolute ceiling of optimization in Digimon Time Stranger.
Builds & Loadouts#
The creator doesn’t discuss specific builds or loadouts in the traditional sense (equipment, moves, etc.). The focus is purely on stat maximization. However, the implicit loadout philosophy is:
- Baby-stage Digimon as your core unit—any baby works, but one with the lowest base stats is ideal.
- Multiple farming Digimon of various stages (rookie, champion, ultimate) to generate the feeder chain.
- Throwaway Digimon with no investment to serve as consolidation vessels in the mid-tier feeding stages.
The creator mentions Beelzemon, Flamedramon, and Lightdramon as examples of strong Digimon that can be maxed and used as feeders. These aren’t specific recommendations—they’re simply examples of Digimon the creator had on hand. Any Digimon can be fed; the species doesn’t matter for stat transfer.
If you’re not trying to min-max: The creator explicitly states that maxing white stats alone is sufficient for mega-plus difficulty content. Building perfect blue stats is a “try hard” optimization that’s “not needed” for normal progression. If you’re enjoying the game without this grind, you don’t need to do it. But if you want the absolute strongest Digimon possible, this is the only path.
Farming Loop / Route Efficiency#
The farming loop isn’t a single repeatable route but rather a cyclical feeding process:
- Loop 1: Farm or level Digimon to accumulate 4,000–5,000 blue stats. (Time varies; use AFK farming if available.)
- Loop 2: Feed 2–3 of these into a fresh Digimon to create a 7,000+ stat feeder. Repeat until you’ve got many 7,000+ feeders.
- Loop 3: Feed five 7,000+ feeders into a fresh Digimon to create a 9,999-stat feeder. Repeat five times to create five 9,999 feeders.
- Final Feed: Feed all five 9,999 feeders into your level-99 baby Digimon.
The creator doesn’t provide specific timing for each loop, but emphasizes that the entire process is “a lot of work” and “a lot of time.” Optimization comes from using AFK XP farming to level Digimon in the background while you manually handle the feeding chain.
Expected yield: One perfect Digimon per complete cycle. There’s no shortcut; you must complete all tiers to reach the cap.
Troubleshooting & Common Mistakes#
- Mistake: Feeding a maxed white-stat Digimon and expecting stat transfer. Fix: Check if the source Digimon’s white stats are capped at 9,999. If yes, it can’t feed any stats. Only blue stats transfer; white stats are locked once maxed.
- Mistake: Trying to jump from 4,000-stat Digimon directly to your baby target. Fix: Build intermediate tiers first. Feed multiple 4,000-stat Digimon into a consolidation vessel to create 7,000+ feeders, then feed those into your baby.
- Mistake: Not leveling your baby target to 99 before feeding. Fix: A baby at low level can’t accept the full amount of feeding. Level to 99 first to unlock maximum capacity.
- Mistake: Using a strong adult or mega Digimon as your final target. Fix: Baby-stage Digimon have the lowest base stats, meaning they’ve got the most room for blue stat growth. Use a baby as your target, not an adult.
- Mistake: Expecting to reach 9,999 with fewer than five high-tier feeders. Fix: The creator states you need approximately five 7,000+ stat Digimon to create one 9,999 feeder, and five 9,999 feeders to max your baby. This isn’t negotiable; it’s the system’s design.
- Mistake: Confusing blue stats with white stats. Fix: White stats are permanent and capped. Blue stats are what you’re actually farming and transferring. Focus entirely on blue stats for optimization.
- Mistake: Believing online guides that say “just max white stats and you’re done.” Fix: That’s true for casual play, but false if you want perfect Digimon. This guide is the “clear one” precisely because most guides skip or misrepresent the blue stat system.

Advanced Tips & Time Saves#
Use AFK XP farming for all leveling. The creator mentions an AFK farming video on their channel. Implement this immediately to level your target baby to 99 and to generate XP for your feeder chain while you sleep or do other tasks. This is the only reasonable way to make the grind tolerable.
Pre-plan your feeder chain. Before you start, count how many Digimon you’ll need at each tier. If you need five 9,999 feeders, you’ll need 25 Digimon with 7,000+ stats (5 feeders × 5 sources each). Knowing this upfront prevents wasted effort.
Reuse your farming method. Once you’ve created your first 9,999 feeder, you’ve learned the exact process. Repeat it four more times with minimal deviation. Consistency saves time.
Don’t optimize for perfection on every Digimon. The creator explicitly states this is optional. If you’re building a second or third optimized Digimon, you may want to stop at maxed white stats to save time. Only go for the full 9,999 blue stat treatment if you genuinely want the absolute best.
FAQ#
What’s the difference between white stats and blue stats in Digimon Time Stranger?#
White stats are base stats that cap at 9,999 and can’t increase once maxed; feeding a Digimon with capped white stats transfers nothing. Blue stats are growth stats that transfer at a percentage when you feed one Digimon to another, and these are what you actually farm to optimize your Digimon.
Why should I use a baby-stage Digimon instead of an adult or mega?#
Baby Digimon have the lowest base stats in the game, which means they’ve got the most room for blue stats to grow. An adult or mega Digimon starts with higher white stats, leaving less space for blue stat accumulation. Baby stage is the blank slate you need for maximum potential.
How many Digimon do I need to create one perfect 9,999-stat Digimon?#
You’ll need a pyramid: many Digimon with 4,000–5,000 blue stats, consolidated into fewer Digimon with 7,000+ stats (roughly five mid-tier feeders per consolidation), then five of those 7,000+ feeders combined to create one 9,999 feeder. You repeat this five times to get five 9,999 feeders, which then feed into your baby target. The exact count depends on your starting point, but expect to farm or create dozens of Digimon.
Is maxing blue stats required to progress through the game?#
No. The creator explicitly states that maxing white stats alone is sufficient for mega-plus content and normal progression. Maxing blue stats is a “try hard” optimization for players who want the absolute strongest Digimon possible. If you’re enjoying the game without this grind, you don’t need it.
What’s the fastest way to level a Digimon to 99?#
The creator references an AFK XP farming method on their channel as the recommended approach. Manual leveling is extremely tedious, so automating it via AFK farming is the only practical way to make the stat-building grind tolerable.
Can I feed a Digimon with maxed white stats to another Digimon?#
No. Once white stats reach 9,999, feeding that Digimon to others stops working entirely. Only Digimon with room to grow white stats (or any uncapped stats) can successfully transfer stats when fed. This is why the creator emphasizes using fresh, low-stat baby Digimon as your target—they have space to receive all the incoming stats.
Checklist#
- Understand the difference: white stats cap at 9,999 and lock; blue stats transfer at percentages.
- Choose a baby-stage Digimon as your final target (lowest base stats = most growth potential).
- Level your baby target to 99 to unlock maximum feeding capacity.
- Farm or generate Digimon with 4,000–5,000 blue stats (first tier).
- Consolidate 2–3 of these into fresh Digimon to create 7,000+ blue stat feeders (second tier).
- Consolidate five 7,000+ feeders into a fresh Digimon to create a 9,999 blue stat feeder (third tier).
- Repeat the third tier five times to create five separate 9,999-stat Digimon.
- Feed all five 9,999-stat Digimon into your level-99 baby target.
- Verify your baby now has 9,999 blue stats (or close to it) across all stat types.
- Use AFK farming to automate XP grinding in the background.
- Accept that this process is intentionally grindy; there’s no shortcut.
- Remember: maxed white stats alone is sufficient for normal play. Blue stat maxing is optional optimization.
Source & credit#
This guide draws on the excellent video walkthrough by Haki Lusitano — watch it for the full visual run-through, and give the creator your view:
https://www.youtube.com/watch?v=n-gQy6L_Of8Following Digimon Story: Time Stranger? Get an email when we publish a new guide — or update one after a patch.